0%

2017年9月4日 上午11:32

理解hosts文件

作者:Wildog
链接:https://www.zhihu.com/question/19782572/answer/12946786
来源:知乎
著作权归作者所有。商业转载请联系作者获得授权,非商业转载请注明出处。

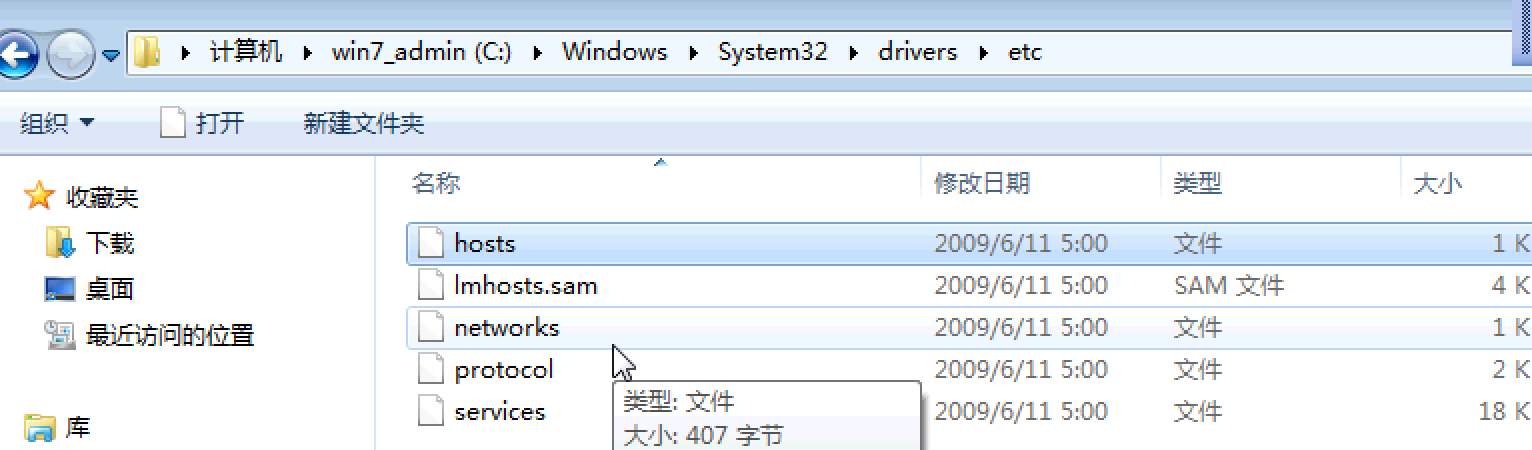
  1. 为了方便用户记忆,我们将IP变成一个个的域名来输入到浏览器进行访问。而这使得访问网站时要先将其域名解析成 IP 。DNS (Domain Name Server) 的作用就是进行 IP 解析,把域名对应到 IP。在 Great FireWall 的 5 种封锁方法中,有一种简单而效果很好的方法是 DNS 污染。GFW 会对 DNS 的解析过程进行干扰,这会使对某些被干扰的域名返回一个错误的 IP 地址给你的主机,使你无法正确连接到你要的服务器上读取正确的信息。Hosts 文件本来是用来提高解析效率。
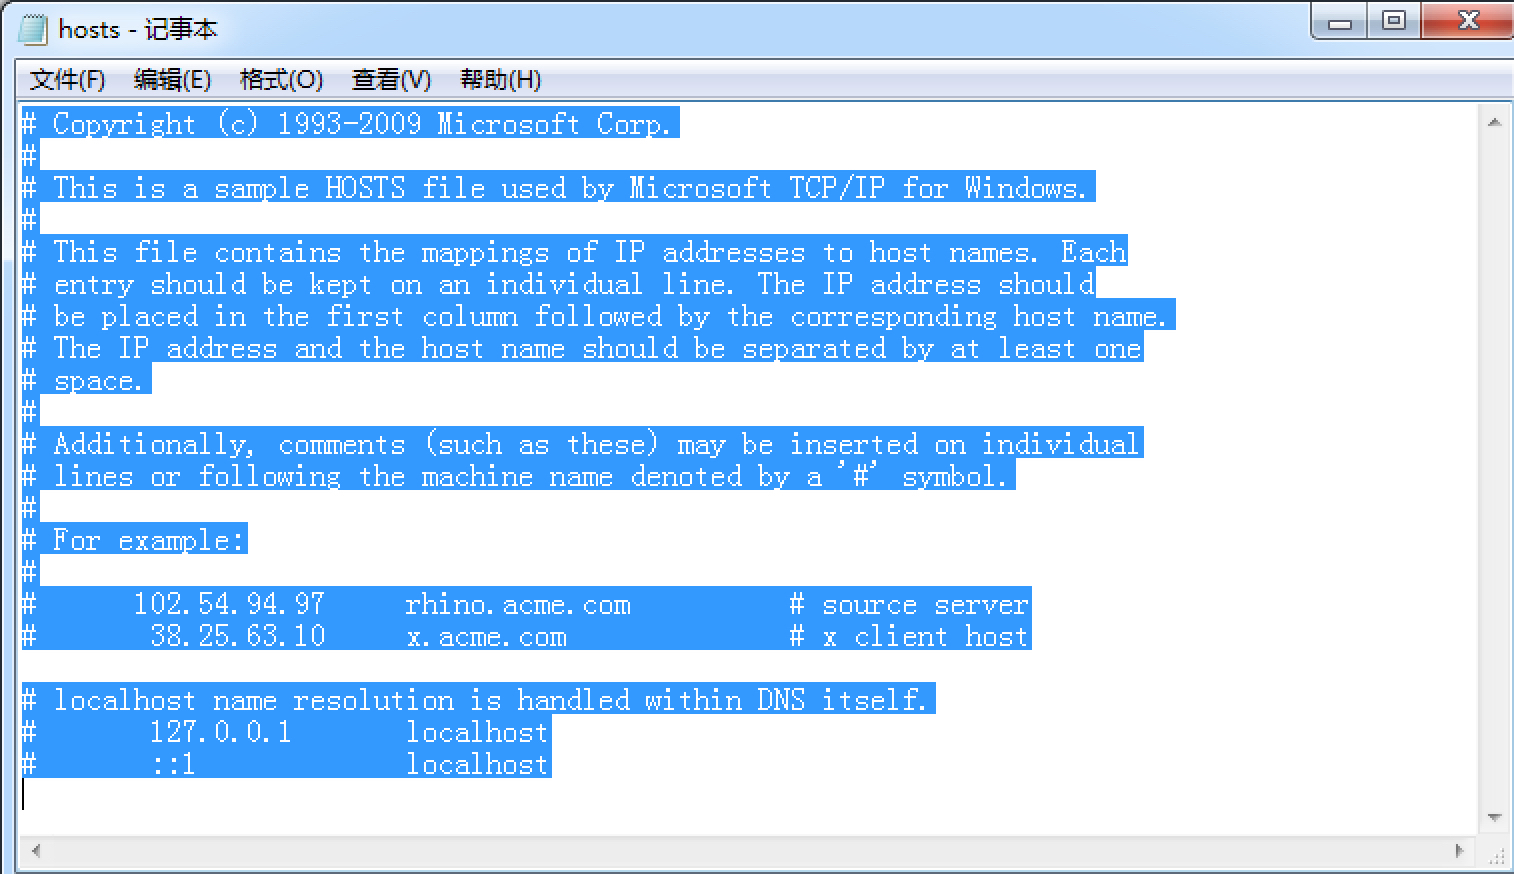
  2. 在进行 DNS 请求以前,系统会先检查自己的 Hosts 文件中是否有这个地址映射关系,如果有则调用这个 IP 地址映射,如果没有再向已知的 DNS 服务器提出域名解析。也就是说 Hosts 的请求级别比 DNS 高。当你的 Hosts 文件里面有对应的 IP 时,它就会直接访问那个 IP,而不用通过 DNS。
  3. 所以,当我们直接将 Google、Twitter、Facebook 之类的 IP 放入 Hosts 文件后,就可以跳过 DNS 的解析这一步,直接就行 IP 访问,不受 GFW 的 DNS 污染干扰了。补充一条,就是为什么 Hosts 的 IP 要时不时更改,为什么 FB、Twitter 会仍旧上不去。是因为 GFW 的第二个大招,IP 封锁。比如访问国外一个 IP 无法访问,Ping 不通,tracert 这个 IP 后发现,全部在边缘路由器 (GFW) 附近被拦截。换言之,GFW 直接拦截带有这个 IP 头的数据包。所以,如果你更改的 IP 被封锁了,就算你过了 DNS 这一关,也仍旧不能翻过 GFW。

window7下hosts文件位置

C:\Windows\System32\drivers\etc

可以看出,hosts文件默认是空的

2017年9月4日 上午11:25

注:即使oracle中要提交commit之后,才能在真正的写到磁盘中,但是在使用jdbc时,jar包中的源码会自动的补充提交一次commit,这就和navicat premiun中操作oracle一样了

通过java,将多个sql语句组合成一个事务

  1. 作用:事务的原子性
  2. 将数据库的事务提交方式设为手动
    conn.setAutoCommit(false);
  3. 提交事务单元
    conn.commit();
1
2
3
4
5
6
7
8
9
10
11
12
13
14
15
16
17
18
19
20
21
22
23
24
25
26
27
28
29
30
31
32
33
34
35
36
37
38
39
40
41
42
43
44
45
46
47
package com.shanxi.weixin;

import java.sql.Connection;
import java.sql.DriverManager;
import java.sql.ResultSet;
import java.sql.SQLException;
import java.sql.Statement;

public class JDBCDemo {

public static void main(String[] args) {

try {
//1、加载驱动类
Class.forName("com.mysql.jdbc.Driver");
//2、获取数据库连接对象connection //jdbc:mysql://localhost:3306/test?useUnicode=true&characterEncoding=utf8
Connection conn = DriverManager.getConnection("jdbc:mysql://localhost:3306/test4","root", "root");
//System.out.println(conn);
//3、通过connection 获取操作数据库的对象 statement
Statement sta = conn.createStatement();
//4、使用statement对象操作数据库完成相应的业务
//2.1 将数据库的事务提交方式设为手动
conn.setAutoCommit(false);
int a = sta.executeUpdate("delete from company where company_id in (9,10)");
int b = sta.executeUpdate("delete from company where company_id = 1 ");
int c = sta.executeUpdate("insert into company(company_id,company_name) values(null,'ccc')");
int d = sta.executeUpdate("insert into company(company_id,company_name) values(3,'ddd')");
//ResultSet rs = sta.executeQuery("select * from people");
//2.2 提交事务单元
conn.commit();
//5、处理结果集
System.out.println(a + b + c + d);

// while(rs.next()){
// System.out.println(rs.getString("name")+"---"+rs.getString("idcard"));
// }
//6、关闭资源,释放空间。
if(conn!=null){
conn.close();
}
}catch (ClassNotFoundException e) {
e.printStackTrace();
}catch (SQLException e) {
e.printStackTrace();
}
}
}
1
2
3
4
5
6
7
8
9
10
11
12
13
14
15
16
17
18
19
20
21
22
23
24
25
26
27
28
29
30
31
32
33
34
35
36
37
38
39
package com.shanxi.weixin;

import java.sql.Connection;
import java.sql.DriverManager;
import java.sql.ResultSet;
import java.sql.SQLException;
import java.sql.Statement;

public class JDBCDemo2 {

public static void main(String[] args) {

try {
//1、加载驱动类
Class.forName("oracle.jdbc.driver.OracleDriver");
Connection conn = DriverManager.getConnection("jdbc:oracle:thin:@192.168.42.43:1521:orcl","gao", "gao");
//System.out.println(conn);
//3、通过connection 获取操作数据库的对象 statement
Statement sta = conn.createStatement();
//4、使用statement对象操作数据库完成相应的业务
//ResultSet rs = sta.executeQuery("select * from stu");
int a =sta.executeUpdate("delete from stu where s_id = 20");
int b =sta.executeUpdate("insert into stu(s_id,s_name) values(9,'aaa')");
//5、处理结果集
// while(rs.next()){
// System.out.println(rs.getString("s_name")+"---"+rs.getString("s_addr"));
// }
System.out.println(a + b);
//6、关闭资源,释放空间。
if(conn!=null){
conn.close();
}
}catch (ClassNotFoundException e) {
e.printStackTrace();
}catch (SQLException e) {
e.printStackTrace();
}
}
}

2017年9月4日 上午8:48

我把原来windows的php项目放到Mac上时出现了pear不能正常使用的情况

解决:

  1. 现象1+现象2:​
    1. 原因:表面上看是路径上的问题,但是,本质上是我一开始使用pear的时候理解不到位,按照百度上的各种资料查查查,改改改,以后改的乱七八糟。
    2. 解决:我在pear中安装了pear install Mail,pear install Mail_Mine,pear install Net_SMTP
  2. 现象3:邮箱的代理密码过期了,重新弄一个就行了
    1. 参考的文章:PHP使用Pear发送邮件(Windows环境)

总结:

  1. 对待新的知识我当初没有理解清楚就去做了,当时也是费了千辛万苦,觉得好难,但是现在回过头去看,这么简单的东西一个就应该学会的啊,这是为什么?。
  2. 一方面来说我当时时间紧,不可能等你完全弄懂了在去操作,一方面是自己的能力还是不够,经验还是不足​。
  3. 下图就是我搞出的笑话。

  1. 我一开始就把pear理解成类库,所以就在TP手册中查怎样才能调用第三方类库,最后找到了Vendor,pear也在vendor中有一份
  2. 这样各种策论混在以前用使用pear 又使用vendor,虽然最后功能成功了,但是其实也没学下啥,脑子里一团糟,根本给别人讲不通。
  3. 总结,面对这样的问题,我们首先要看自己有没有一个思路,不要想自己当初一样,就知道熬夜,像无头苍蝇一样乱撞。在保持自己清晰的思路之后,要想到和比自己强的人请教,虚心求教,这方面我的确需要更加努力! ​

​附录:安装过程

1
2
3
4
5
6
7
8
9
10
11
12
13
14
15
16
17
18
19
20
21
22
23
24
25
26
27
28
29
30
31
32
33
34
35
36
37
38
39
40
41
42
43
44
45
46
47
48
49
50
51
52
53
54
55
56
57
58
59
60
61
62
63
64
65
66
67
68
69
70
71
72
73
74
75
76
77
78
79
80
81
82
83
84
85
86
87
88
89
90
91
92
93
94
95
96
97
98
99
100
101
102
103
104
105
106
107
Last login: Wed Jun 21 16:44:16 on ttys001

czhdeMacBook-Pro:~ czh$ kill -INT `cat /usr/local/var/run/php-fpm.pid`

czhdeMacBook-Pro:~ czh$ launchctl load -w ~/Library/LaunchAgents/homebrew.mxcl.php56.plist

czhdeMacBook-Pro:~ czh$ kill -INT `cat /usr/local/var/run/php-fpm.pid`

czhdeMacBook-Pro:~ czh$ echo 'export PATH="$(brew --prefix php70)/bin:$PATH"' >> ~/.bash_profile #for php

czhdeMacBook-Pro:~ czh$ echo 'export PATH="$(brew --prefix php70)/sbin:$PATH"' >> ~/.bash_profile #for php-fpm

czhdeMacBook-Pro:~ czh$ echo 'export PATH="/usr/local/bin:/usr/local/sbib:$PATH"' >> ~/.bash_profile #for other brew install soft

czhdeMacBook-Pro:~ czh$ source ~/.bash_profile

czhdeMacBook-Pro:~ czh$ php -v

PHP 7.0.14 (cli) (built: Dec 9 2016 07:34:25) ( NTS )

Copyright (c) 1997-2016 The PHP Group

Zend Engine v3.0.0, Copyright (c) 1998-2016 Zend Technologies

czhdeMacBook-Pro:~ czh$ launchctl load -w ~/Library/LaunchAgents/homebrew.mxcl.php70.plist

/Users/czh/Library/LaunchAgents/homebrew.mxcl.php70.plist: No such file or directory

czhdeMacBook-Pro:~ czh$ launchctl load -w ~/Library/LaunchAgents/homebrew.mxcl.php7.plist

/Users/czh/Library/LaunchAgents/homebrew.mxcl.php7.plist: No such file or directory

czhdeMacBook-Pro:~ czh$ ln -sfv /usr/local/opt/php70/*.plist ~/Library/LaunchAgents

/Users/czh/Library/LaunchAgents/homebrew.mxcl.php70.plist -> /usr/local/opt/php70/homebrew.mxcl.php70.plist

czhdeMacBook-Pro:~ czh$ launchctl load -w ~/Library/LaunchAgents/homebrew.mxcl.php70.plist

czhdeMacBook-Pro:~ czh$ pear install Mail

WARNING: configuration download directory "/tmp/pear/install" is not writeable. Change download_dir config variable to a writeable dir to avoid this warning

WARNING: channel "pear.php.net" has updated its protocols, use "pear channel-update pear.php.net" to update

Cannot install, php_dir for channel "pear.php.net" is not writeable by the current user

czhdeMacBook-Pro:~ czh$ sudo pear install Mail

Password:

WARNING: channel "pear.php.net" has updated its protocols, use "pear channel-update pear.php.net" to update

Did not download optional dependencies: pear/Net_SMTP, use --alldeps to download automatically

pear/Mail can optionally use package "pear/Net_SMTP" (version >= 1.4.1)

downloading Mail-1.4.1.tgz ...

Starting to download Mail-1.4.1.tgz (21,756 bytes)

........done: 21,756 bytes

install ok: channel://pear.php.net/Mail-1.4.1

czhdeMacBook-Pro:~ czh$ sudo pear install Mail_Mine

No releases available for package "pear.php.net/Mail_Mine"

install failed

czhdeMacBook-Pro:~ czh$ sudo pear install Mail_Mime

WARNING: channel "pear.php.net" has updated its protocols, use "pear channel-update pear.php.net" to update

downloading Mail_Mime-1.10.1.tgz ...

Starting to download Mail_Mime-1.10.1.tgz (36,336 bytes)

..........done: 36,336 bytes

install ok: channel://pear.php.net/Mail_Mime-1.10.1

czhdeMacBook-Pro:~ czh$ sudo pear install Net_SMTP

WARNING: channel "pear.php.net" has updated its protocols, use "pear channel-update pear.php.net" to update

WARNING: "pear/Auth_SASL" is deprecated in favor of "pear/Auth_SASL2"

Did not download optional dependencies: pear/Auth_SASL, use --alldeps to download automatically

pear/Net_SMTP can optionally use package "pear/Auth_SASL" (version >= 1.0.5)

downloading Net_SMTP-1.8.0.tgz ...

Starting to download Net_SMTP-1.8.0.tgz (14,399 bytes)

.....done: 14,399 bytes

downloading Net_Socket-1.2.2.tgz ...

Starting to download Net_Socket-1.2.2.tgz (6,903 bytes)

...done: 6,903 bytes

install ok: channel://pear.php.net/Net_Socket-1.2.2

install ok: channel://pear.php.net/Net_SMTP-1.8.0

2017年9月4日 上午8:30

1
2
3
4
5
6
7
8
9
10
11
12
13
14
15
16
17
18
19
20
21
22
23
24
25
26
27
28
29
30
31
32
33
34
35
36
37
38
39
40
41
42
43
44
45
46
47
48
49
50
51
52
53
54
55
56
57
58
59
60
61
62
63
64
65
66
67
68
69
70
71
72
73
74
75
76
77
78
79
80
81
82
83
84
85
86
87
88
89
90
91
92
93
94
95
96
97
98
99
100
101
102
103
104
105
106
107
108
109
110
111
112
113
114
115
116
117
118
119
120
121
122
123
124
125
126
127
128
129
130
131
132
133
134
135
136
137
138
139
140
141
142
143
144
145
146
147
148
149
150
151
152
153
154
155
156
157
158
159
160
161
162
163
164
165
166
167
168
169
170
171
172
173
czhdeMacBook-Pro:~ czh$ sudo php -d detect_unicode=0 go-pear.phar

Password:

Below is a suggested file layout for your new PEAR installation. To

change individual locations, type the number in front of the

directory. Type 'all' to change all of them or simply press Enter to

accept these locations.

1. Installation base ($prefix) : /usr/local/Cellar/php70/7.0.14_7

2. Temporary directory for processing : /tmp/pear/install

3. Temporary directory for downloads : /tmp/pear/install

4. Binaries directory : /usr/local/Cellar/php70/7.0.14_7/bin

5. PHP code directory ($php_dir) : /usr/local/Cellar/php70/7.0.14_7/share/pear

6. Documentation directory : /usr/local/Cellar/php70/7.0.14_7/docs

7. Data directory : /usr/local/Cellar/php70/7.0.14_7/data

8. User-modifiable configuration files directory : /usr/local/Cellar/php70/7.0.14_7/cfg

9. Public Web Files directory : /usr/local/Cellar/php70/7.0.14_7/www

10. System manual pages directory : /usr/local/Cellar/php70/7.0.14_7/man

11. Tests directory : /usr/local/Cellar/php70/7.0.14_7/tests

12. Name of configuration file : /usr/local/etc/php/7.0/pear.conf

1-12, 'all' or Enter to continue: 1

(Use $prefix as a shortcut for '/usr/local/Cellar/php70/7.0.14_7', etc.)

Installation base ($prefix) [/usr/local/Cellar/php70/7.0.14_7] : /usr/local/pear

Below is a suggested file layout for your new PEAR installation. To

change individual locations, type the number in front of the

directory. Type 'all' to change all of them or simply press Enter to

accept these locations.

1. Installation base ($prefix) : /usr/local/pear

2. Temporary directory for processing : /tmp/pear/install

3. Temporary directory for downloads : /tmp/pear/install

4. Binaries directory : /usr/local/pear/bin

5. PHP code directory ($php_dir) : /usr/local/pear/share/pear

6. Documentation directory : /usr/local/pear/docs

7. Data directory : /usr/local/pear/data

8. User-modifiable configuration files directory : /usr/local/pear/cfg

9. Public Web Files directory : /usr/local/pear/www

10. System manual pages directory : /usr/local/pear/man

11. Tests directory : /usr/local/pear/tests

12. Name of configuration file : /usr/local/etc/php/7.0/pear.conf

1-12, 'all' or Enter to continue: 4

(Use $prefix as a shortcut for '/usr/local/pear', etc.)

Binaries directory [$prefix/bin] : /usr/local/bin

Below is a suggested file layout for your new PEAR installation. To

change individual locations, type the number in front of the

directory. Type 'all' to change all of them or simply press Enter to

accept these locations.

1. Installation base ($prefix) : /usr/local/pear

2. Temporary directory for processing : /tmp/pear/install

3. Temporary directory for downloads : /tmp/pear/install

4. Binaries directory : /usr/local/bin

5. PHP code directory ($php_dir) : /usr/local/pear/share/pear

6. Documentation directory : /usr/local/pear/docs

7. Data directory : /usr/local/pear/data

8. User-modifiable configuration files directory : /usr/local/pear/cfg

9. Public Web Files directory : /usr/local/pear/www

10. System manual pages directory : /usr/local/pear/man

11. Tests directory : /usr/local/pear/tests

12. Name of configuration file : /usr/local/etc/php/7.0/pear.conf

1-12, 'all' or Enter to continue:

Beginning install...

Configuration written to /usr/local/etc/php/7.0/pear.conf...

Initialized registry...

Preparing to install...

installing phar:///Users/czh/go-pear.phar/PEAR/go-pear-tarballs/Archive_Tar-1.4.2.tar...

installing phar:///Users/czh/go-pear.phar/PEAR/go-pear-tarballs/Console_Getopt-1.4.1.tar...

installing phar:///Users/czh/go-pear.phar/PEAR/go-pear-tarballs/PEAR-1.10.4.tar...

installing phar:///Users/czh/go-pear.phar/PEAR/go-pear-tarballs/Structures_Graph-1.1.1.tar...

installing phar:///Users/czh/go-pear.phar/PEAR/go-pear-tarballs/XML_Util-1.4.2.tar...

install ok: channel://pear.php.net/Archive_Tar-1.4.2

install ok: channel://pear.php.net/Console_Getopt-1.4.1

install ok: channel://pear.php.net/Structures_Graph-1.1.1

install ok: channel://pear.php.net/XML_Util-1.4.2

install ok: channel://pear.php.net/PEAR-1.10.4

PEAR: Optional feature webinstaller available (PEAR's web-based installer)

PEAR: Optional feature gtkinstaller available (PEAR's PHP-GTK-based installer)

PEAR: Optional feature gtk2installer available (PEAR's PHP-GTK2-based installer)

PEAR: To install optional features use "pear install pear/PEAR#featurename"

******************************************************************************

WARNING! The include_path defined in the currently used php.ini does not

contain the PEAR PHP directory you just specified:

If the specified directory is also not in the include_path used by

your scripts, you will have problems getting any PEAR packages working.

Would you like to alter php.ini ? [Y/n] : Y

php.ini include_path updated.

Current include path : .:

Configured directory : /usr/local/pear/share/pear

Currently used php.ini (guess) : /usr/local/etc/php/7.0/php.ini

Press Enter to continue:

The 'pear' command is now at your service at /usr/local/bin/pear

2017年9月4日 上午8:30

简单原理:关闭原来的php-fpm,将新的环境变量写入,然后设置开机自启。
总结:这回的操作就不是从网上找的,而是靠自己的理解,尝试出来的结果。还是那就话,始终要提醒自己要有一个清晰的头脑去思考问题。​

补充:用到的指令

关闭php-fpm

kill -INT cat /usr/local/var/run/php-fpm.pid

php7.0 写入新的环境变量

1
2
3
4
5
6
7
echo 'export PATH="$(brew --prefix php70)/bin:$PATH"' >> ~/.bash_profile  #for php

echo 'export PATH="$(brew --prefix php70)/sbin:$PATH"' >> ~/.bash_profile #for php-fpm

echo 'export PATH="/usr/local/bin:/usr/local/sbib:$PATH"' >> ~/.bash_profile #for other brew install soft

source ~/.bash_profile

php开机自启

1
2
3
4
5
ln -sfv /usr/local/opt/php70/*.plist ~/Library/LaunchAgents

launchctl load -w ~/Library/LaunchAgents/homebrew.mxcl.php70.plist


其他人的方法:

刚刚装了php7 nginx下有多个php版本,怎么选择使用哪一个? - SegmentFault

2017年9月4日 上午8:28

问题:ssh -I 秘钥 用户名@ip 之后一直都是 operation timed out
原因:安全组上没有配置好
解决:

​注意上图可以直接选择linux 开放22端口,腾讯都给我们想好了

在这个图中展示了,三个问题

  1. operation timed out –配置安全组
  2. the authenticity of hose*to the list of known host–这个是因为我在已存在的安全组中配置开放22端口。原因我不知道,但是正如腾讯所提示的一样,我们最好还是新建一个安全组去配置22端口。
  3. 权限 –常见问题了​​​

2017年9月4日 上午8:25

首先我先梳理一下思路,然后再中间遇到的问题,逐一说明我的解决方法。

思路:

核心操作:

mysql -h [IP] -u [user] -p 
mysql> source _Users_czh_Downloads_*.sql ;
scp _path_filename username@servername:/path  

1:连接数据库,将本地的sql表导入

**1.1:**ERROR 1130: Host '192.168.1.3' is not allowed to connect to this MySQL server 
         方法:http://blog.csdn.net/july_2/article/details/41896295
         注意:这里面要注意人家写的用户名 和 密码  这是自己的,千万不要像我一样直接抄,不然报错eg:1.3
**1.2:**ERROR 1819 (HY000): Your password does not satisfy the current policy requirements
       原因:在安装完msyql之后,的初始化配置文件中,我把validate_password_policy =1,所以当给新的用户注册密码时,简单密码是通不过的。
        方法:http://www.cnblogs.com/ivictor/p/5142809.html
**1.3:**ERROR 1045 (28000): Access denied for user 'root'@'localhost' (using password: YES)
        原因:就是密码输错的,笨蛋!就知道抄,不去理解人家的意思!看图一
        方法:http://www.cnblogs.com/kerrycode/p/4368312.html
**1.4:**  Permission denied, please try again(publickey,password)
        原因:由于您没有将公钥( publickey )  添加到本地 ssh 环境造成的,或者是由于多日未 进行ssh 登录操作,本地 publickey 失效造成的
       方法:http://www.mr-wu.cn/ssh-permission-denied-publickey/
                   http://blog.csdn.net/weixin_36397141/article/details/54618867
                   https://zhidao.baidu.com/question/188203613.html
       以上三步我都做了。第一步是重点!
       补充:http://www.cnblogs.com/jiangyao/archive/2011/01/26/1945570.html  scp的操作

2:在/var/www/html中导入项目

  导入运行,发现很多错。
  **2.1:**STORAGE_WRITE_ERROR_:._Runtime_Cache_Home_
       原因:正如提示的 存储写错误 ,一般都是权限不够
       解决:给那个Application所有权限就可以了,http://www.thinkphp.cn/topic/22933.html
 **2.2:**Call to undefined function: simplexml_load_string() in cron file
        原因:本项目需要 php7.0-xml模块,而我安装php7.0的时候没安装
        解决:sudo apt-get install php7.0-xml  ,https://stackoverflow.com/questions/31206186/call-to-undefined-function-simplexml-load-string-in-cron-file/36407094
 **2.3:**关于 ThinkPHP 在 Nginx 服务器上 使用U方法跳转问题
        原因:不知道,在Mac window上没问题
        解决:define('_PHP_FILE_',$_SERVER['SCRIPT_NAME']);
            在php入口文件中增加:http://www.cnblogs.com/chy1993/p/6590320.html
                   修改nginx配置文件:http://blog.csdn.net/df981011512/article/details/53128573
                   我仅仅修改入口文件就好了!
 **2.4:**关于图片显示不出来
        原因:一些界面资源我都放在Public中,但是由于nginx严格区分大小写,并且我html中link资源的时写的是public/....所以找不到路径。
        解决:更改文件夹名
        补充:重命名命令http://www.linuxidc.com/Linux/2015-01/111116.htm
**2.5:** thinkphp 在ngin中的配置文件
        原因:我用了很多网上查了很多,但是都报错,自己就综合写了一个
        解决:附件1

总结:

1.ubuntu对大小写,权限要求很严格,一定要习惯
2.要学会linux中的排错,尤其是根据日志 我也不会!
3.服务器中的东西虽然没具体的学过,但是我突然发现,那个nginx的配置文件读起来就和写代码感觉一样!
4.百度也要会百度,要提取出问题的关键词


图1

附件一:

1
2
3
4
5
6
7
8
9
10
11
12
13
14
15
16
17
18
19
20
21
22
23
24
25
26
27
28
29
30
31
32
33
34
35
36
37
38
39
40
41
42
43
44
45
46
47
48
49
50
51
52
53
54
55
56
57
58
59


server {
listen 80 default_server;
listen [::]:80 default_server;

root /var/www;
index index.php index.html index.htm index.nginx-debian.html;

server_name server_domain_or_IP;

error_page 404 /404.html;
location = /404.html {
return 404 'Sorry, File not Found!';
}
error_page 500 502 503 504 /50x.html;
location = /50x.html {
root /usr/share/nginx/html; # windows用户替换这个目录
}

location / {
try_files $uri @rewrite;
}

location @rewrite {
set $static 0;
if ($uri ~ \.(css|js|jpg|jpeg|png|gif|ico|woff|eot|svg|css\.map|min\.map)$) {
set $static 1;
}

if ($static = 0) {
rewrite ^/(.*)$ /index.php?s=/$1;
}

}

location ~ /Uploads/.*\.php$ {
deny all;
}

location ~ \.php/ {
if ($request_uri ~ ^(.+\.php)(/.+?)($|\?)) { }
fastcgi_pass unix:/run/php/php7.0-fpm.sock;
include snippets/fastcgi-php.conf;
fastcgi_param SCRIPT_NAME $1;
fastcgi_param PATH_INFO $2;
fastcgi_param SCRIPT_FILENAME $document_root$1;
}

location ~ \.php$ {
include snippets/fastcgi-php.conf;
fastcgi_pass unix:/run/php/php7.0-fpm.sock;
fastcgi_param SCRIPT_FILENAME $document_root$fastcgi_script_name;
}

location ~ /\.ht {
deny all;
}
}

2017年9月4日 上午8:20

fuck,这篇本来写完了,最后提醒让打开flash,我点‘‘总是打开’’,然后他就给我刷新了!!!!!

参考文章:手把手教你从头搭建Web服务器及LEMP环境(使用Ubuntu16.04+Nginx+MySQL+PHP)_nginx_WEB-ITnose

注意点:

1.要进行mysql安装完后的配置。补充一
2.php安装完知道要设置cgi.fix_pathinfo=0,是为了安全。
3.涉及到vim,忘了就百度
4.我以前竟然不知道外网ip可以直接进去,还以为必须备案,解析了才可以!傻!

从玩带界面的ubuntu 到 Mac下配置环境 再到
服务器中配置环境。从以前的只会照别人的说明书一步步的按,到后来明白为其中的道理,再到现在比较熟练的完成。这也是知识慢慢积累的一个过程,感谢刚哥在配置mac环境时帮助我我这只迷失的羔羊,thanks。

补充一:

1
2
3
4
5
6
7
8
9
10
11
12
13
14
15
16
17
18
19
20
21
22
23
24
25
26
27
28
29
30
31
32
33
34
35
36
37
38
39
40
41
42
43
44
45
46
47
48
49
50
51
52
53
54
55
56
57
58
59
60
61
ubuntu@VM-219-69-ubuntu:~$ sudo mysql_secure_installation

Securing the MySQL server deployment.

Enter password for user root:

VALIDATE PASSWORD PLUGIN can be used to test passwords
and improve security. It checks the strength of password
and allows the users to set only those passwords which are
secure enough. Would you like to setup VALIDATE PASSWORD plugin?

Press y|Y for Yes, any other key for No: y

There are three levels of password validation policy:

LOW Length >= 8
MEDIUM Length >= 8, numeric, mixed case, and special characters
STRONG Length >= 8, numeric, mixed case, special characters and dictionary file

Please enter 0 = LOW, 1 = MEDIUM and 2 = STRONG: 1
Using existing password for root.

Estimated strength of the password: 50
Change the password for root ? ((Press y|Y for Yes, any other key for No) : l

... skipping.
By default, a MySQL installation has an anonymous user,
allowing anyone to log into MySQL without having to have
a user account created for them. This is intended only for
testing, and to make the installation go a bit smoother.
You should remove them before moving into a production
environment.

Remove anonymous users? (Press y|Y for Yes, any other key for No) : l

... skipping.


Normally, root should only be allowed to connect from
'localhost'. This ensures that someone cannot guess at
the root password from the network.

Disallow root login remotely? (Press y|Y for Yes, any other key for No) : l

... skipping.
By default, MySQL comes with a database named 'test' that
anyone can access. This is also intended only for testing,
and should be removed before moving into a production
environment.


Remove test database and access to it? (Press y|Y for Yes, any other key for No) : l

... skipping.
Reloading the privilege tables will ensure that all changes
made so far will take effect immediately.

Reload privilege tables now? (Press y|Y for Yes, any other key for No) : y
Success.

All done!

2017年9月4日 上午8:16

参考:Mac OS X 通过终端 SSH 连接腾讯云服务器 – 老柴的宅

第一感觉,我学的信息安全知识终于用上了,这些知识看上去全是概念,没啥用,但是对你理解一些操作有很大的帮助。

两个提醒:

first: 要从腾讯云中创建RSA pair ,然后 bind 一个服务器,将private key 下载下来。
second:一定要更改private key 的权限, 要不会warning。

2017年9月4日 上午8:08

ORACLE MYSQL 对比

  1. 分页
    1. ORACLE的rownum
    2. MYSQL的limit
  2. group by
    1. ORACLE会丢失没有声明字段
    2. MYSQL不会丢失
  3. select 临时表
    1. ORACLE需要使用dual临时表
    2. MYSQL不需要使用临时表就可以直接操作select语句
  4. 时间类函数
    1. MYSQL的时间操作函数更加方便
    2. 这可以作为选数据库的依据
  5. 事务提交
    1. ORACLE需要手动提交
    2. MYSQL如果想自己手动提交需要些start transaction
  6. 主键
    1. ORACLE主键不自增,需要使用sequence对象来是实现
    2. MYSQL声明为primary key时,自动递增

JDBC: java database connection

  1. jdbc是一门使用java后台完成数据库访问的技术。
  2. 使用jdbc操作数据库需要做以下准备:
    1. 准备工作:
      1. mysql: mysql-connector-java-5.1.22.jar
      2. oracle: jdbc_lib_ojdbc6.jar
      3. Oralce的架包,自己安装包中就有,路径如图1
      4. Mysql去网上找吧
    2. 加载驱动类
    3. 获取数据库连接对象connection
    4. 通过connection 获取操作数据库的对象 statement
    5. 使用statement对象操作数据库完成相应的业务
    6. 处理结果集
    7. 关闭资源,释放空间。


图1


statement

MYSQL statement 例子

例子:通过JDBC进行简单的增删改查(以MySQL为例) - 五岳 - 博客园
注:这里例子里面用的是pstmt = (PreparedStatement) conn.prepareStatement(sql);,代替了Statement sta = conn.createStatement();。也就是能够使用预编译来传参。

1
2
3
4
5
6
7
8
9
10
11
12
13
14
15
16
17
18
19
20
21
22
23
24
25
26
27
28
29
30
31

public class JdbcDemo1 {

public static void main(String[] args) {
// TODO Auto-generated method stub
try {
//1、加载驱动类
Class.forName("com.mysql.jdbc.Driver");
//2、获取数据库连接对象connection //jdbc:mysql://localhost:3306/test?useUnicode=true&characterEncoding=utf8
Connection conn = DriverManager.getConnection("jdbc:mysql://localhost:3306/wordpress","root", "");
//System.out.println(conn);
//3、通过connection 获取操作数据库的对象 statement
Statement sta = conn.createStatement();
//4、使用statement对象操作数据库完成相应的业务
ResultSet rs = sta.executeQuery("select * from wp_users");
//5、处理结果集
while(rs.next()){
System.out.println(rs.getString("user_login")+"---"+rs.getString("user_pass"));
}
//6、关闭资源,释放空间。
if(conn!=null){
conn.close();
}
}catch (ClassNotFoundException e) {
e.printStackTrace();
}catch (SQLException e) {
e.printStackTrace();
}
}

}

ORACLE statement 例子

注意:jdbc:oracle:thin:@192.168.42.43:1521:orcl 要写当前具体ip,不能写localhost,127.0.0.1 不知道为啥

1
2
3
4
5
6
7
8
9
10
11
12
13
14
15
16
17
18
19
20
21
22
23
24
25
26
27
28
29
30
31
32
33
34
35
36
37
38
39
package com.shanxi.weixin;

import java.sql.Connection;
import java.sql.DriverManager;
import java.sql.ResultSet;
import java.sql.SQLException;
import java.sql.Statement;

public class JDBCDemo2 {

public static void main(String[] args) {

try {
//1、加载驱动类
Class.forName("oracle.jdbc.driver.OracleDriver");
Connection conn = DriverManager.getConnection("jdbc:oracle:thin:@192.168.42.43:1521:orcl","gao", "gao");
//System.out.println(conn);
//3、通过connection 获取操作数据库的对象 statement
Statement sta = conn.createStatement();
//4、使用statement对象操作数据库完成相应的业务
//ResultSet rs = sta.executeQuery("select * from stu");
int a =sta.executeUpdate("delete from stu where s_id = 20");
int b =sta.executeUpdate("insert into stu(s_id,s_name) values(9,'aaa')");
//5、处理结果集
// while(rs.next()){
// System.out.println(rs.getString("s_name")+"---"+rs.getString("s_addr"));
// }
System.out.println(a + b);
//6、关闭资源,释放空间。
if(conn!=null){
conn.close();
}
}catch (ClassNotFoundException e) {
e.printStackTrace();
}catch (SQLException e) {
e.printStackTrace();
}
}
}

JDBC预编译 preparstatement

增删改

1
2
3
4
5
6
7
8
9
10
11
12
13
14
15
16
17
18
19
20
21
22
23
24
25
26
27
28
29
30
31
32
33
34
package com.shanxi.weixin;

import java.sql.Connection;
import java.sql.DriverManager;
import java.sql.PreparedStatement;
import java.sql.ResultSet;
import java.sql.SQLException;
import java.sql.Statement;

public class JDBCDemo4 {

public static void main(String[] args) {

try {
Class.forName("com.mysql.jdbc.Driver");
Connection conn = DriverManager.getConnection("jdbc:mysql://localhost:3306/test4?useUnicode=true&characterEncoding=utf8","root", "root");
String sql = "insert into people(name,age,sex) values(?,?,?)";
PreparedStatement ps = conn.prepareStatement(sql);
ps.setString(1, "mike");
ps.setString(3, "boy");
ps.setInt(2, 20);
int a = ps.executeUpdate();
System.out.println(a);
if(conn!=null){
conn.close();
}

}catch (ClassNotFoundException e) {
e.printStackTrace();
}catch (SQLException e) {
e.printStackTrace();
}
}
}
1
2
3
4
5
6
7
8
9
10
11
12
13
14
15
16
17
18
19
20
21
22
23
24
25
26
27
28
29
30
31
32
33
34
35
36
package com.shanxi.weixin;

import java.sql.Connection;
import java.sql.DriverManager;
import java.sql.PreparedStatement;
import java.sql.ResultSet;
import java.sql.SQLException;
import java.sql.Statement;

public class JDBCDemo3 {

public static void main(String[] args) {

try {
Class.forName("com.mysql.jdbc.Driver");
Connection conn = DriverManager.getConnection("jdbc:mysql://localhost:3306/test4?useUnicode=true&characterEncoding=utf8","root", "root");
//获取预编译对象 preparstatement
PreparedStatement ps = conn.prepareStatement("select * from people where id = ? ");
//如果预编译对象绑定的sql中含有参数。那么在操作数据库之前需将参数依次传入
ps.setInt(1, 9);
//执行对应的操作,获得对应结果集
ResultSet rs = ps.executeQuery();
while(rs.next()){
System.out.println(rs.getString("name"));
}
if(conn!=null){
conn.close();
}

}catch (ClassNotFoundException e) {
e.printStackTrace();
}catch (SQLException e) {
e.printStackTrace();
}
}
}

JDCB批处理

1
2
3
4
5
6
7
8
9
10
11
12
13
14
15
16
17
18
19
20
21
22
23
24
25
26
27
28
29
30
31
32
33
34
35
36
37
38
39
40
41
42
43
44
45
46
47
48
49
50
package com.shanxi.weixin;

import java.sql.Connection;
import java.sql.DriverManager;
import java.sql.PreparedStatement;
import java.sql.ResultSet;
import java.sql.SQLException;
import java.sql.Statement;

public class JDBCDemo5 {

public static void main(String[] args) {

try {
Class.forName("com.mysql.jdbc.Driver");
Connection conn = DriverManager.getConnection("jdbc:mysql://localhost:3306/test4?useUnicode=true&characterEncoding=utf8","root", "root");
String sql = "insert into people(name,age,sex) values(?,?,?)";
//Statement sta = conn.createStatement();

//打开一个预编译对象 同时绑定sql
PreparedStatement ps = conn.prepareStatement(sql);
ps.setString(1, "bob");
ps.setString(3, "boy");
ps.setInt(2, 22);
//将本条sql处理 加入批处理
ps.addBatch();

ps.setString(1, "mary");
ps.setString(3, "girl");
ps.setInt(2, 18);
//将重新设置参数后的预编译sql继续加入批处理
ps.addBatch();
//同时也可以绑定多条静态sql
ps.addBatch("insert into people(name,age,sex) values('rose',19,'girl')");
//执行批处理任务
int[] counts = ps.executeBatch();
ps.clearBatch();
for (int i : counts) {
System.out.println(i);
}
if(conn!=null){
conn.close();
}
}catch (ClassNotFoundException e) {
e.printStackTrace();
}catch (SQLException e) {
e.printStackTrace();
}
}
}

Java project中引入架包


图1

图2:这里要选取Add External JARS

图3

查看架包重要引入的文件Driver.jar