0%

2018年2月21日 上午12:26

学习实战 - 随笔分类 - shirayner - 博客园

测试网址:

happymmall.com
Welcome to nginx!
Apache Tomcat/7.0.73
GitHub - czh55/imooc
ftp://192.168.16.111/
登录 - 支付宝
http://image.imooc.com/

老师的课堂资料

http://learning.happymmall.com/happymmallv1.svg
Java从零打造企业级电商项目实战-服务端_课程问答-FAQ_慕课手记
happymmall课程QQ群分享手记_慕课手记
找工作的季节之简历及找工作的分享_慕课手记
WiKi - 码云 Gitee.com

密码:

在这里:软件开发的相关密码

2018年2月21日 上午12:19

注:最后有课程大纲
其实就是学习课程中的课堂笔记和在改进过程中的一些问题:

基础知识:

重新认识java-java提高篇
枚举的实现原理(三)
枚举类的学习(二)
枚举类的学习(一)

按课程内容顺序整理出来的知识点

注:

  1. 大部分都是落实到代码层次去理解,很多都是和框架本身相关的
  2. 自己实现和学习的过程中报的编译器错误,或者自己不理解实现原理的问题。
  3. 站在了一个框架学习的角度

    第三部分(按时间顺序):

    修改nginx图片服务器的域名修改
    为什么是List list = new ArrayList(),而不直接用ArrayList
    从request获取各种路径总结
    通过新建报名信息代码再次理解vo以及assemble***()
    在FTP上传中巧用static
    关于新增产品功能的解释:
    数据表结构汇总汇总
    转:订单表如何设计的思考过程
    前台获取管理员id,并进行判断
    @Param()相关报错
    对项目中使用的vo的解读
    Spring @Autowired 注释_w3cschool
    对ServerResponse的理解
    报错:找不到alipay包文件

    中期配置:

    常用网站+密码
    centos开机启动项
    idea配置2

    第一部分完毕(按时间顺序):

    支付宝支付测试:
    订单管理模块
    关于项目结构的思考🤔
    内网穿透
    远程debug,远程部署
    支付宝模块
    有一些mysql容易忽略的问题
    收获地址管理模块
    购物车模块
    MyBatis语法简单说明
    service平级调用
    泛型:以responseService为例子
    文件上传(文件夹上传,多文件上传)
    web请求访问过程及相关配置文件讲解
    项目配置文件详解
    从servlet演进到springMVC
    page-helper
    控制反转
    商品管理
    java连接数据库的演进过程
    mybatis-generator 补充
    myBatis-generator理解
    分类管理
    用户管理
    数据库设计

    基本环境搭建:

    idea中配置git
    idea配置+项目提交+chrome插件
    maven project中红线报错
    mybatis 三剑客
    idea设置+新建maven项目
    tomcat与jdk的搭配
    Mac切换JDK版本
    Mac 安装maven
    centos安装配置git
    centos安装mysql
    mysql权限
    修改nginx图片服务器的域名
    centos安装nginx:在配置文件中实现反向代理
    centos安装vsftpd
    centos安装配置apache
    centos安装maven
    centos安装jdk
    更改centos镜像源

课程安排:

结构图
happymmallv1.svg
第1章课程介绍
1-1 课程导学
1-2 项目功能与业务逻辑介绍
1-3 课程安排与学习收获
1-4 大型Java项目架构演进解析
第2章开发环境安装与配置讲解、实操
2-1 linux软件源配置与学习建议
2-2 linux软件源配置实操
2-3 jdk安装讲解(选看)
2-4 jdk安装实操(linux)
2-5 jdk安装实操(windows)
2-6 tomcat安装讲解(选看)
2-7 tomcat安装实操(linux)
2-8 tomcat安装实操(windows)
2-9 maven项目构建与管理工具安装讲解(选看)
2-10 maven项目构建与管理工具安装实操(linux)
2-11 maven项目构建与管理工具安装实操(windows)
2-12 vsftpd文件服务器安装与配置讲解(选看)
2-13 vsftpd文件服务器安装与配置实操(linux)
2-14 ftpserver文件服务器安装与配置实操(windows)
2-15 nginx反向代理服务器安装与配置讲解(选看)
2-16 nginx反向代理服务器安装与配置实操(linux)
2-17 nginx反向代理服务器域名解析配置实操(linux)
2-18 nginx反向代理服务器安装与配置实操(windows)
2-19 nginx反向代理服务器域名解析配置实操(windows…
2-20 nginx反向代理服务器域名解析配置细节补充-autoi…
2-21 文件服务器搭建及原理讲解
2-22 mysql数据库安装与配置讲解(选看)
2-23 mysql数据库安装与配置实操(linux)
2-24 mysql数据库安装与配置实操(windows)
2-25 git版本控制工具安装与配置讲解(选看)
2-26 9it版本控制工具安装与配置实操(linux)
2-27 git版本控制工具安装与配置实操(windows)
第3章数据表结构设计
3-1 数据表结构设计
3-2 数据表关系设计
3-3 数据表索引与时间戳讲解
第4章项目初始化
4-1 项目初始化概要
4-2 数据库初始化
4-3 idea项目开发工具安装实操(mac)
4-4 idea项目开发工具安装实操(windows)
4-5 jdk、tomcat、maven配置及初始化web空白项目
4-6 git初始化
4-7 maven的pom文件配置
4-8 项目包结构初始化
4-9 mybatis三剑客之mybatis-generator配置
4-10 mybatis三剑客之mybatis-generator生成数据对象…
4-11 mybatis三剑客之mybatis-plugin讲解
4-12 mybatis三剑客之mybatis-pagehelper分页插件讲解
4-13 spring官方demo指引及配置
4-14 spring、springmvc配置实操
4-15 logback配置讲解
4-16 ftp服务器配置讲解
4-17 idea的注入和自动编译配置
4-18 项目初始化代码提交
4-19 两个提高工作效率的神器-Restlet Client和fe助手
第5章用户模块开发
5-1 用户模块开发概要与接口设计讲解
5-2 登录功能开发
5-3 登出,注册,校验功能开发
5-4 获取用户登录信息,忘记密码,提示问题与答案,…
5-5 忘记密码中的重置密码功能开发
5-6 登录状态下重置密码功能开发
5-7 更新用户个人信息功能开发
5-8 获取用户详细信息功能开发及MD5加密补充
5-9 用户模块所有功能自测试
第6章分类管理模块开发
6-1 分类管理模块开发概要与接口设计讲解
6-2 添加分类和更新分类名字功能开发
6-3 查询节点和递归查找功能开发
6-4 分类管理模块所有功能自测
第7章商品管理模块开发
7-1 商品管理模块开发概要与接口设计讲解
7-2 后台商品新增,保存,更新,上下架功能开发
7-3 后台获取商品详情功能开发及PropertiesUtilSB置工…
7-4 后台商品列表动态分页功能开发
7-5 后台商品搜索功能开发
7-6 后台商品图片的springmvc上传与富文本上传ftp服务…
7-7 后台商品图片的springmvc上传与富文本上传ftp服务…
7-8 前台商品详情,列表,搜索,动态排序功能开发
7-9 商品管理模块所有功能自测
第8章购物车模块开发
8-1 购物车模块开发概要与接口设计讲解
8-2 加入购物车功能开发1
8-3 加入购物车功能开发2
8-4 更新,删除购物车商品功能开发
8-5 全选,全反选,单选,单反选,查询购物车商品数…
8-6 购物车模块所有功能自测
第9章收货地址管理模块开发
9-1 收货地址管理模块开发概要与接口设计讲解
9-2 收货地址增,删,改,查,分页列表,地址详情功…
9-3 收获地址管理模块所有功能自测
第10章支付模块开发
10-1 支付模块开发概要与接口设计讲解
10-2 支付宝支付功能对接要点讲解(知识点补充)
10-3 支付宝支付功能重要文档简介(知识点补充)
10-4 支付宝支付功能官方Demo调试实操1(知识点补充)
10-5 支付宝支付功能官方Demo调试实操2(知识点补充)
10-6 支付宝支付功能开发1
10-7 支付宝支付功能开发2
10-8 支付宝支付回调函数实现与支付宝SDK源码解析
10-9 查询订单支付状态功能开发
10-10 支付模块所有功能自测 第11章订单管理模块开发
第11章订单管开发
11-1 订单模块开发概要及接口设计讲解
11-2 创建订单,清空购物车等功能开发1
11-3 创建订单,清空购物车等功能开发2
11-4 取消订单,获取购物车中商品信息功能开发
11-5 前后台订单列表,订单详情,发货功能开发
11-6 订单管理模块所有功能自测
第12 章云服务器线上部署与自动化发布,验证,故障…
12-1 云服务器部署概要讲解
12-2 云服务器购买、管理、配置实操
12-3 线上域名购买、解析讲解
12-4 线上云服务器用户创建实操
12-5 线上环境安装配置实操(jdk-tomcat-maven-vsftpd-n…
12-6 线上环境安装配置实操(mysql)
12-7 线上环境安装配置实操(git)
12-8 线上防火墙配置实操
12-9 服务端项目自动化发布、验证、故障排查与解决
第13章课程回顾与下期展望
13-1 课程回顾与下期展望

详细介绍:http://coding.imooc.com/class/chapter/96.html

2018年2月21日 下午9:55

登录centos

1
2
3
localhost:~ czh$ ssh root@192.168.16.111
root@192.168.16.111's password:123456
Last login: Mon Feb 19 22:57:28 2018 from 192.168.16.100

配置防火墙:

1
[czh@centos6 vhost]$ sudo vim /etc/sysconfig/iptables

防火墙开闭:

1
2
3
4
5
6
7
8
9
10
11
12
13
14
15
关闭虚拟机防火墙:

关闭命令: service iptables stop

永久关闭防火墙:chkconfig iptables off

两个命令同时运行,运行完成后查看防火墙关闭状态
service iptables status

1 关闭防火墙-----sudo service iptables stop
2 启动防火墙-----sudo service iptables start
3 重启防火墙-----sudo service iptables restart
4 查看防火墙状态--sudo service iptables status
5 永久关闭防火墙--sudo chkconfig iptables off
6 永久关闭后启用--sudo chkconfig iptables on

启动nginx

1
[czh@localhost ~]$ sudo /usr/local/nginx/sbin/nginx

启动apache

1
[czh@localhost ~]$ ~/developer/apache-tomcat-7.0.73/bin/startup.sh

启动mysql

1
[czh@localhost bin]$ sudo service mysqld restart

连接mysql:

1
localhost:~ czh$ mysql -h 192.168.16.111 -u root -p

启动vsftpd:

1
[czh@centos6 vsftpd]$ sudo service vsftpd restart

2018年2月21日 下午6:39

从这里开始就不是以动手为主了,而是要快速的抓住geely的idea,同时也尽量节省时间

todo

我还要写两篇文章

  1. 讲解配置
  2. 讲解spring springMVC Mybatis 各自的功能以及联系
  3. 记得更改logback.xml中的各种地址 ,方法:全局搜索imooc
  4. 建立restlet

用户管理

  1. 横向越权+纵向越权

    1. 用户id和username从session中获取,而不是用户输入
    2. 在线状态下更改密码时,此时只需要oldPassword , newPassword。
    3. 更改用户信息时,只需要需要更改的信息eg phone
  2. Guava缓存

  3. token

    1. 第一步请求:通过提交问题答案来更改密码,如果答案回答正确,返回token
    2. 第二步请求:username newPassword token三个参数请求
  4. salt值

    1. 在md5加密的时候加上salt值
  5. 高复用服务响应对象的设计思想和抽象封装

    1. 指的是common/ServerResponse
    2. 可以把ServerResponse的对象理解成service对外传递信息的唯一方式,不论是controller用还是,通过controller传递给对外的接口,依然为ServerResponse对象类型
    3. 他牛逼的一点是他通过泛型可以传递所有类型的信息,这就是所谓的复用
  6. 快捷键:

    1. psvm tab tab :主函数
    2. sout tab tab :输出
    3. 断点调试

用户整体的结构图:

  1. 【两个核心】:最底下的UserServiceImpl,UserController是程序运作的“马达”,是程序运行的灵活
    1. 他们依赖(虚线)于众多的对象,所以他们处在最底层。而没有人依赖于他们
  2. 【两个组合】:组合对象一般都是对自己最有用的部分,地位要远大于依赖的对象
    1. UserMapper——>UserServiceImpl
    2. IUserService——>UserController
  3. 【一个实现】:
    1. UserServiceImpl——>IUserService

理解性的笔记:

  1. 在编码的过程中总会设计一些看似巧妙的东西,他的作用就像是我们整理家一样,东西要分门别类,这样既可以自己心中有数,思维清晰,而且还有利于和别人讲解,捎带的就可以提高编程的效率。也就说本质目的是为了让自己舒服一点,提高编程效率只是一个捎带的。
    1. 从代码的表现来说:一句话就完成了一个的功能,舒服
  2. 注解编程+xml编程:要建立这个意识
  3. 只听视频十分容易累,调节的关键点还是放松心态,不要急于求成
  4. “没有女朋友,那就new一个”。这个看似是一个玩笑话,但是在java却表现出一个认识:涉及到硬件的一些功能,对于程序员看似很困难,其实所谓的硬件就是一个new出来的对象而已,中中意识要有

2018年2月20日 上午11:30

vsftpd安装

1
2
3
4
5
6
7
8
9
10
11
12
13
14
15
16
17
18
19
20
21
22
23
24
25
26
27
28
29
30
31
32
33
34
35
36
37
38
39
40
41
42
43
44
45
[czh@centos6 ~]$ sudo yum -y install vsftpd
已加载插件:fastestmirror, refresh-packagekit, security
设置安装进程
Loading mirror speeds from cached hostfile
* base: mirrors.aliyun.com
* extras: mirrors.aliyun.com
* updates: mirrors.aliyun.com
解决依赖关系
--> 执行事务检查
---> Package vsftpd.x86_64 0:2.2.2-24.el6 will be 安装
--> 完成依赖关系计算

依赖关系解决

================================================================================
软件包 架构 版本 仓库 大小
================================================================================
正在安装:
vsftpd x86_64 2.2.2-24.el6 base 156 k

事务概要
================================================================================
Install 1 Package(s)

总下载量:156 k
Installed size: 340 k
下载软件包:
vsftpd-2.2.2-24.el6.x86_64.rpm | 156 kB 00:00
warning: rpmts_HdrFromFdno: Header V3 RSA/SHA1 Signature, key ID c105b9de: NOKEY
Retrieving key from http://mirrors.aliyun.com/centos/RPM-GPG-KEY-CentOS-6
Importing GPG key 0xC105B9DE:
Userid: "CentOS-6 Key (CentOS 6 Official Signing Key) <centos-6-key@centos.org>"
From : http://mirrors.aliyun.com/centos/RPM-GPG-KEY-CentOS-6
运行 rpm_check_debug
执行事务测试
事务测试成功
执行事务
Warning: RPMDB altered outside of yum.
正在安装 : vsftpd-2.2.2-24.el6.x86_64 1/1
Verifying : vsftpd-2.2.2-24.el6.x86_64 1/1

已安装:
vsftpd.x86_64 0:2.2.2-24.el6

完毕!

创建ftp目录

1
2
[czh@centos6 ~]$ cd /
[czh@centos6 /]$ sudo mkdir ftpfile

创建用户

1
2
3
4
5
6
7
8
9
10
11
12
13
14
[czh@centos6 bin]$ cd /
[czh@centos6 /]$ cd ftpfile/
this is ftpfile
[czh@centos6 ftpfile]$ ls
[czh@centos6 ftpfile]$ sudo useradd ftpuser -d /ftpfile/ -s /sbin/nologin
useradd:警告:此主目录已经存在。
不从 skel 目录里向其中复制任何文件。
[czh@centos6 ftpfile]$ sudo chown -R ftpuser.ftpuser /ftpfile/
[czh@centos6 ftpfile]$ ll
总用量 0
[czh@centos6 ftpfile]$ ll | grep ftp
[czh@centos6 ftpfile]$ cd ..
[czh@centos6 /]$ ll | grep ftp
drwxr-xr-x. 2 ftpuser ftpuser 4096 2月 20 12:17 ftpfile

修改密码:

1
2
3
4
5
6
7
[czh@centos6 /]$  sudo passwd ftpuser
更改用户 ftpuser 的密码 。
新的 密码:
无效的密码: 过于简单化/系统化
无效的密码: 过于简单
重新输入新的 密码:
passwd: 所有的身份验证令牌已经成功更新。

创建文件

1
2
[czh@centos6 /]$ cd ftpfile/
[czh@centos6 ftpfile]$ sudo vim index.html

配置vsftd:

1
2
3
[czh@centos6 ftpfile]$ whereis vsftpd
vsftpd: /usr/sbin/vsftpd /etc/vsftpd /usr/share/man/man8/vsftpd.8.gz
[czh@centos6 ftpfile]$ sudo vim /etc/vsftpd/vsftpd.conf

给vsftpd添加用户ftpuser

1
2
[czh@centos6 ftpfile]$ cd /etc/vsftpd/
[czh@centos6 vsftpd]$ sudo vim chroot_list

配置好后重启vsftp:

1
2
3
[czh@centos6 vsftpd]$ sudo service vsftpd restart
Shutting down vsftpd: [FAILED]
Starting vsftpd for vsftpd: [ OK ]

配置防火墙:

1
[czh@centos6 vsftpd]$ sudo vim /etc/sysconfig/iptables

1
2
3
4
5
6
7
8
9
10
11
12
13
14
15
16
17
18
19
20
21
22
23
24
25
26
27
28
29
30
31
32
33
34
35
36
37
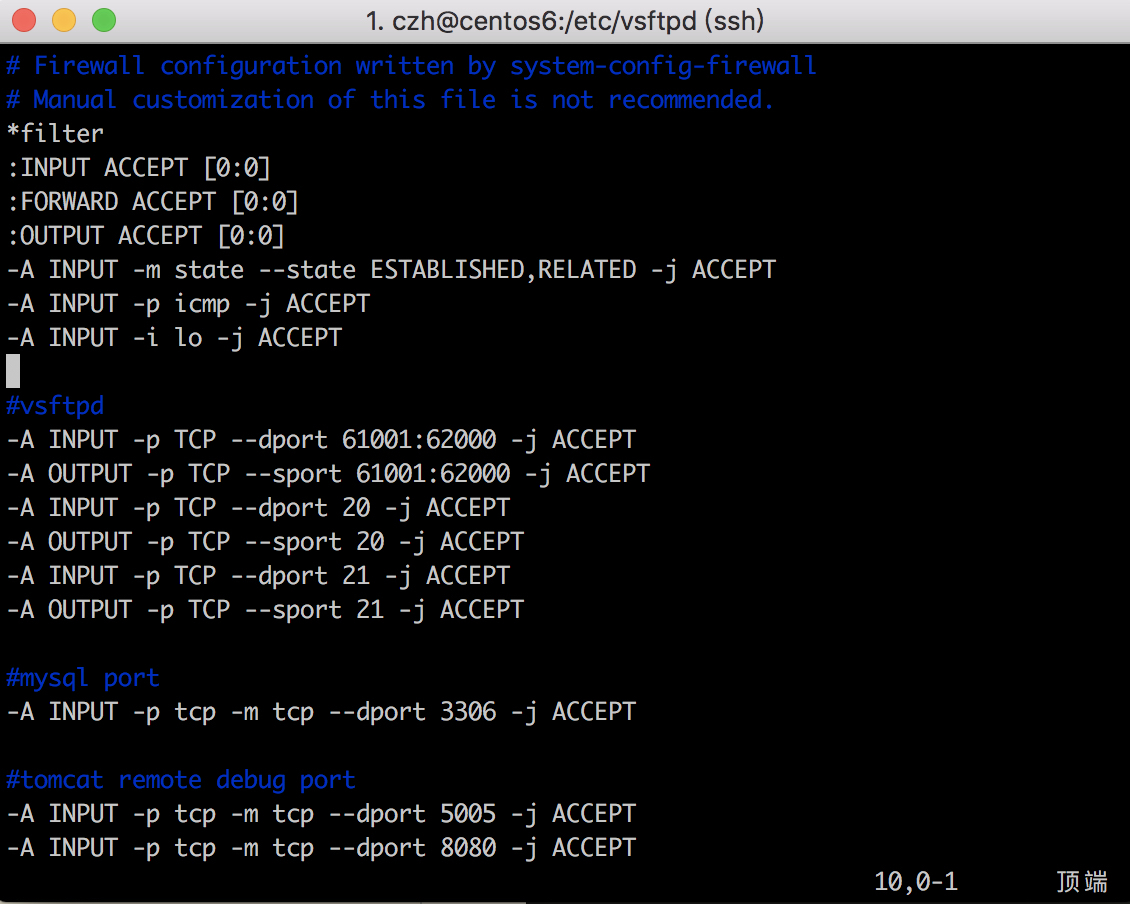
# Firewall configuration written by system-config-firewall
# Manual customization of this file is not recommended.
*filter
:INPUT ACCEPT [0:0]
:FORWARD ACCEPT [0:0]
:OUTPUT ACCEPT [0:0]
-A INPUT -m state --state ESTABLISHED,RELATED -j ACCEPT
-A INPUT -p icmp -j ACCEPT
-A INPUT -i lo -j ACCEPT

#ssh port
-A INPUT -m state --state NEW -m tcp -p tcp --dport 22 -j ACCEPT

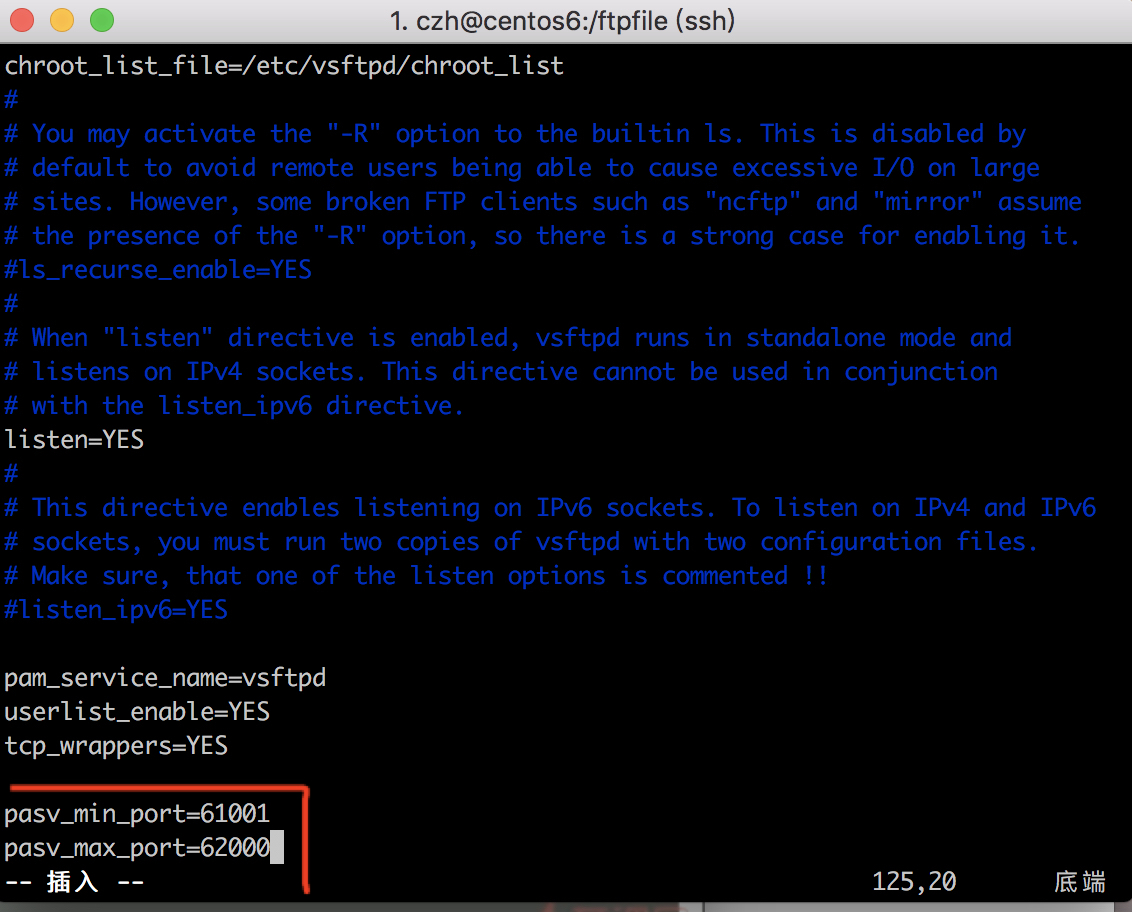
#vsftpd
-A INPUT -p TCP --dport 61001:62000 -j ACCEPT
-A OUTPUT -p TCP --sport 61001:62000 -j ACCEPT

-A INPUT -p TCP --dport 20 -j ACCEPT
-A OUTPUT -p TCP --sport 20 -j ACCEPT
-A INPUT -p TCP --dport 21 -j ACCEPT
-A OUTPUT -p TCP --sport 21 -j ACCEPT


#mysql port
-A INPUT -p tcp -m tcp --dport 3306 -j ACCEPT

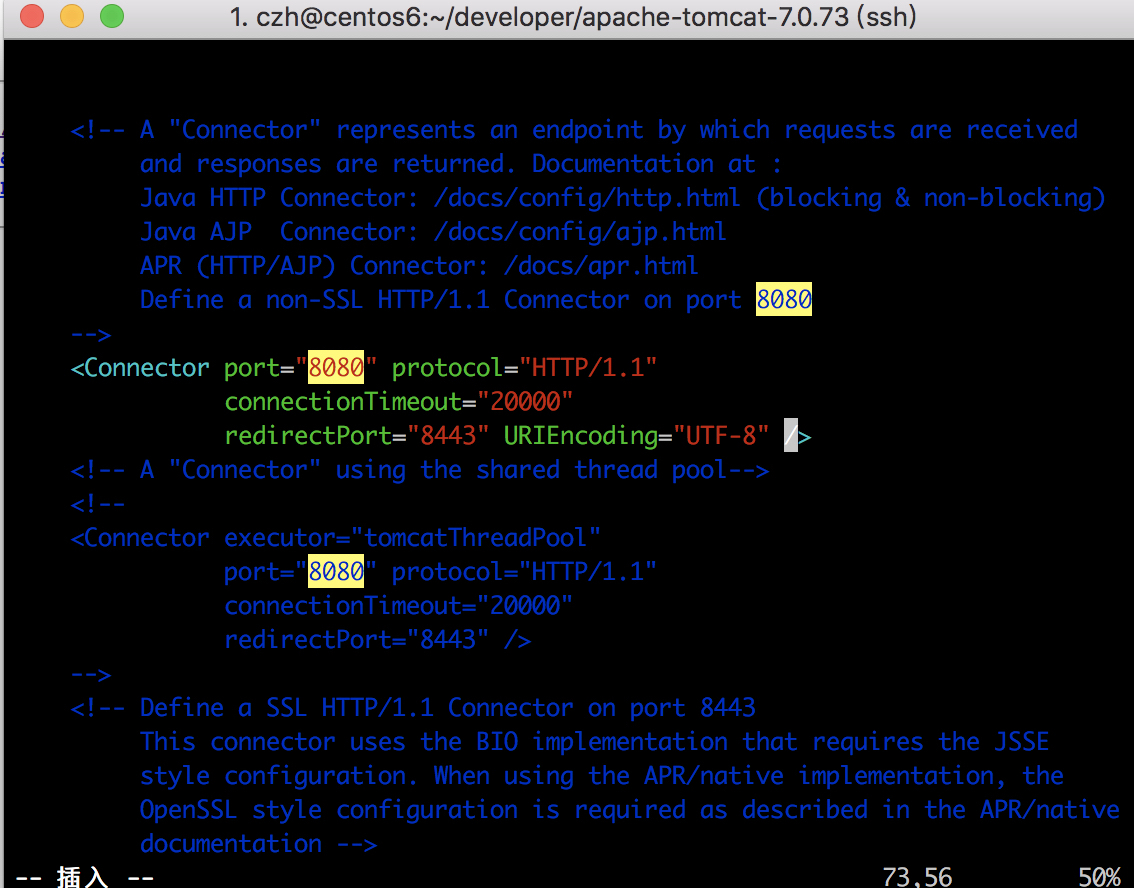
#tomcat remote debug port
-A INPUT -p tcp -m tcp --dport 5005 -j ACCEPT

-A INPUT -p tcp -m tcp --dport 8080 -j ACCEPT

#nginx
-A INPUT -p tcp -m tcp --dport 80 -j ACCEPT

-A INPUT -j REJECT --reject-with icmp-host-prohibited
-A FORWARD -j REJECT --reject-with icmp-host-prohibited
COMMIT

重启防火墙:

1
2
3
[czh@centos6 vsftpd]$ sudo service iptables restart
[sudo] password for czh:
iptables: Applying firewall rules: [ OK ]

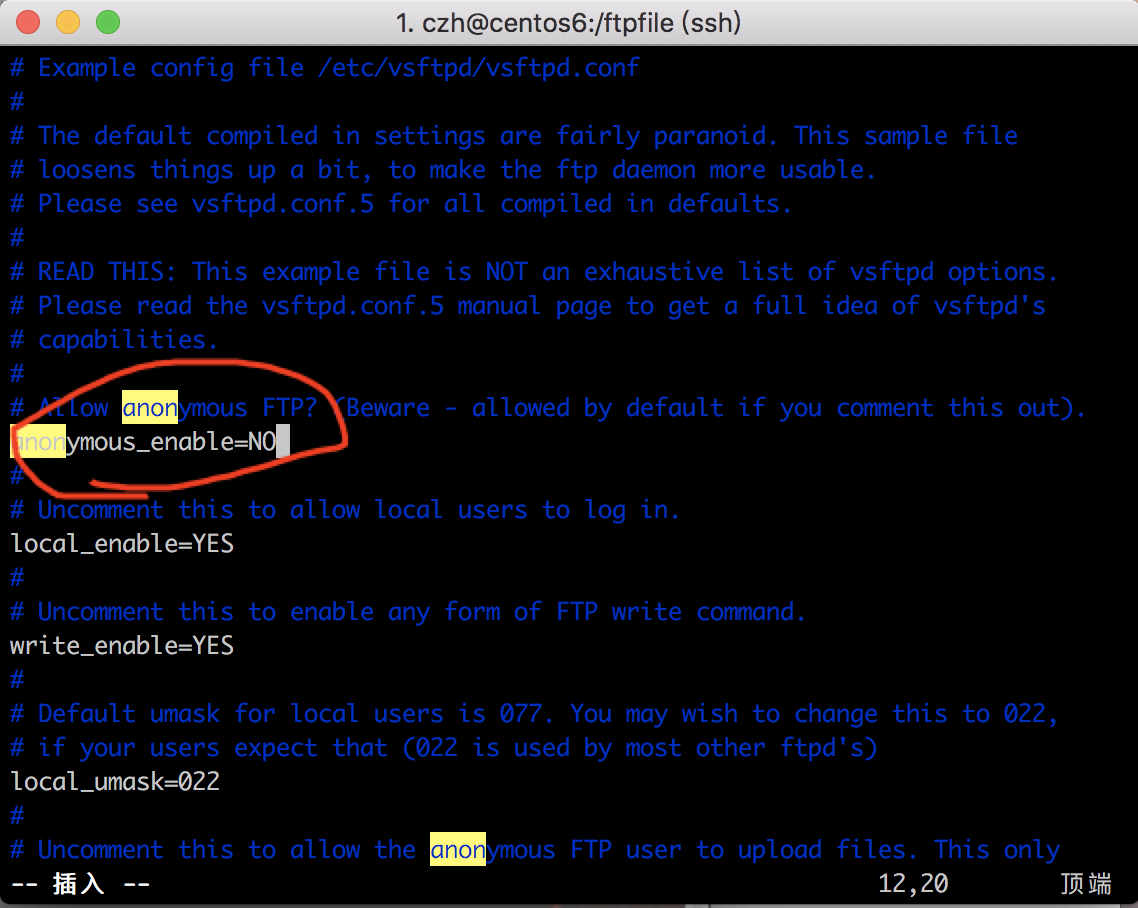
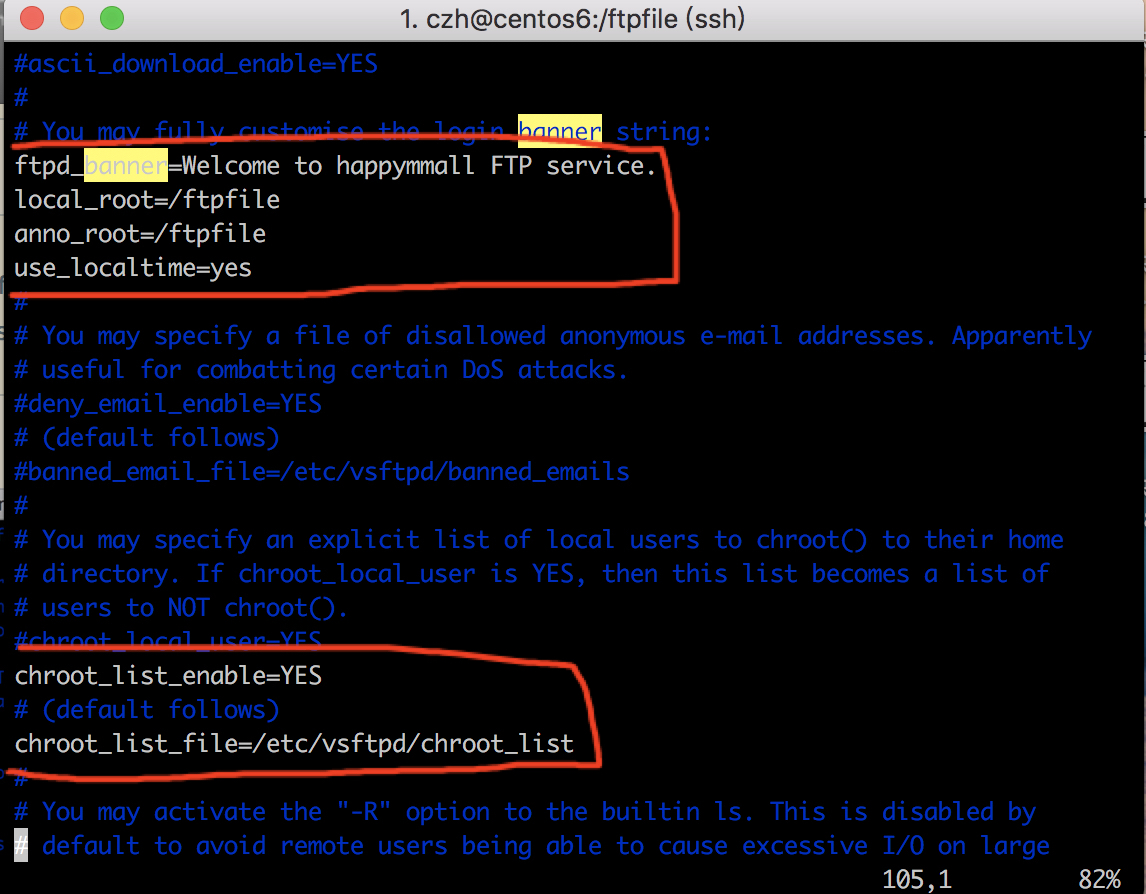
修改selinux:解决外网是可以访问上去了,可是发现没法返回目录

1
2
3
4
5
6
7
8
9
10
11
12
13
14
15
16
17
18
19
[czh@centos6 ftpfile]$ getsebool -a | grep ftp
allow_ftpd_anon_write --> off
allow_ftpd_full_access --> off
allow_ftpd_use_cifs --> off
allow_ftpd_use_nfs --> off
ftp_home_dir --> off
ftpd_connect_db --> off
ftpd_use_fusefs --> off
ftpd_use_passive_mode --> off
httpd_enable_ftp_server --> off
tftp_anon_write --> off
tftp_use_cifs --> off
tftp_use_nfs --> off
[czh@centos6 ftpfile]$ setsebool -P allow_ftpd_full_access on
Cannot set persistent booleans without managed policy.
[czh@centos6 ftpfile]$ sudo setsebool -P allow_ftpd_full_access on
[sudo] password for czh:
[czh@centos6 ftpfile]$ sudo setsebool -P ftp_home_dir on
[czh@centos6 ftpfile]$

防止匿名账户不能创建更改文件情况:

1
2
3
[czh@centos6 ftpfile]$ sudo vim /etc/selinux/config
[czh@centos6 ftpfile]$ sudo setenforce 0
[czh@centos6 ftpfile]$ sudo service vsftpd restart

sudo setenforce 0 用来生效配置

连接方式:

  1. ftp://192.168.0.101/
  2. 要输入账户密码:ftpuesr ,123456

2018年2月20日 上午11:16

下载maven:

1
2
3
4
5
6
7
8
[czh@centos6 bin]$ cd ~/developer/
[czh@centos6 developer]$ wget http://learning.happymmall.com/maven/apache-maven-3.0.5-bin.tar.gz
--2018-02-20 11:18:02-- http://learning.happymmall.com/maven/apache-maven-3.0.5-bin.tar.gz
正在解析主机 learning.happymmall.com... 182.92.82.103
正在连接 learning.happymmall.com|182.92.82.103|:80... 已连接。
已发出 HTTP 请求,正在等待回应... 200 OK
长度:5144659 (4.9M) [text/html]
正在保存至: “apache-maven-3.0.5-bin.tar.gz”

解压

1
[czh@centos6 developer]$ tar -zxvf apache-maven-3.0.5-bin.tar.gz

确定maven地址,修改环境变量

1
2
3
4
5
6
7
8
9
10
11
12
13
[czh@centos6 developer]$ cd apache-maven-3.0.5
[czh@centos6 apache-maven-3.0.5]$ cd bin/
[czh@centos6 bin]$ pwd
/home/czh/developer/apache-maven-3.0.5/bin
[czh@centos6 bin]$ sudo vim /etc/profile
[czh@centos6 bin]$ source /etc/profile
[czh@centos6 bin]$ mvn -version
Apache Maven 3.0.5 (r01de14724cdef164cd33c7c8c2fe155faf9602da; 2013-02-19 21:51:28+0800)
Maven home: /home/czh/developer/apache-maven-3.0.5
Java version: 1.7.0_80, vendor: Oracle Corporation
Java home: /usr/java/jdk1.7.0_80/jre
Default locale: zh_CN, platform encoding: UTF-8
OS name: "linux", version: "2.6.32-642.el6.x86_64", arch: "amd64", family: "unix"
1
2
3
4
export JAVA_HOME=/usr/java/jdk1.7.0_80
export MAVEN_HOME=/home/czh/developer/apache-maven-3.0.5
export CLASSPATH=.:$JAVA_HOME/jre/lib/rt.jar:$JAVA_HOME/lib/dt.jar:$JAVA_HOME/lib/tools.jar
export PATH=$JAVA_HOME/bin:$MAVEN_HOME/bin:$PATH

2018年2月20日 上午10:53

centos下载软件

1
2
3
4
5
6
7
[czh@centos6 developer]$ wget http://learning.happymmall.com/tomcat/apache-tomcat-7.0.73.tar.gz
--2018-02-20 10:53:07-- http://learning.happymmall.com/tomcat/apache-tomcat-7.0.73.tar.gz
正在解析主机 learning.happymmall.com... 182.92.82.103
正在连接 learning.happymmall.com|182.92.82.103|:80... 已连接。
已发出 HTTP 请求,正在等待回应... 200 OK
长度:8938514 (8.5M) [text/html]
正在保存至: “apache-tomcat-7.0.73.tar.gz”

解压apache

1
[czh@centos6 developer]$ tar -zxvf apache-tomcat-7.0.73.tar.gz

配置启动apache

1
2
3
4
5
6
7
8
9
10
11
12
13
14
15
[czh@centos6 developer]$ cd apache-tomcat-7.0.73
[czh@centos6 apache-tomcat-7.0.73]$ ll
总用量 116
drwxr-xr-x. 2 czh czh 4096 2月 20 10:56 bin
drwxr-xr-x. 2 czh czh 4096 11月 8 2016 conf
drwxr-xr-x. 2 czh czh 4096 2月 20 10:56 lib
-rw-r--r--. 1 czh czh 56846 11月 8 2016 LICENSE
drwxr-xr-x. 2 czh czh 4096 11月 8 2016 logs
-rw-r--r--. 1 czh czh 1239 11月 8 2016 NOTICE
-rw-r--r--. 1 czh czh 8965 11月 8 2016 RELEASE-NOTES
-rw-r--r--. 1 czh czh 16195 11月 8 2016 RUNNING.txt
drwxr-xr-x. 2 czh czh 4096 2月 20 10:56 temp
drwxr-xr-x. 7 czh czh 4096 11月 8 2016 webapps
drwxr-xr-x. 2 czh czh 4096 11月 8 2016 work
[czh@centos6 apache-tomcat-7.0.73]$ vim conf/server.xml

启动apache

1
2
3
4
5
6
7
8
[czh@centos6 ftpfile]$ cd ~/developer/apache-tomcat-7.0.73/bin/
[czh@centos6 bin]$ ./startup.sh
Using CATALINA_BASE: /home/czh/developer/apache-tomcat-7.0.73
Using CATALINA_HOME: /home/czh/developer/apache-tomcat-7.0.73
Using CATALINA_TMPDIR: /home/czh/developer/apache-tomcat-7.0.73/temp
Using JRE_HOME: /usr/java/jdk1.7.0_80
Using CLASSPATH: /home/czh/developer/apache-tomcat-7.0.73/bin/bootstrap.jar:/home/czh/developer/apache-tomcat-7.0.73/bin/tomcat-juli.jar
Tomcat started.

关闭防火墙在主机URL访问
centos防火墙开启、关闭、查看状态 - CSDN博客
注:这里通过修改iptables防火墙配置就可以,看后面文章的配置文件

1
2
3
4
5
6
7
8
9
10
11
12
13
14
15
16
17
18
19
20
21
22
23
24
25
26
27
28
29
30
31
32
33
34
35
[czh@centos6 bin]$ ifconfig
eth0 Link encap:Ethernet HWaddr 00:1C:42:2C:1D:A1
inet addr:192.168.16.111 Bcast:192.168.16.255 Mask:255.255.255.0
inet6 addr: fe80::21c:42ff:fe2c:1da1/64 Scope:Link
UP BROADCAST RUNNING MULTICAST MTU:1500 Metric:1
RX packets:283454 errors:0 dropped:0 overruns:0 frame:0
TX packets:169731 errors:0 dropped:0 overruns:0 carrier:0
collisions:0 txqueuelen:1000
RX bytes:288476450 (275.1 MiB) TX bytes:12797131 (12.2 MiB)

lo Link encap:Local Loopback
inet addr:127.0.0.1 Mask:255.0.0.0
inet6 addr: ::1/128 Scope:Host
UP LOOPBACK RUNNING MTU:65536 Metric:1
RX packets:2429 errors:0 dropped:0 overruns:0 frame:0
TX packets:2429 errors:0 dropped:0 overruns:0 carrier:0
collisions:0 txqueuelen:0
RX bytes:210544 (205.6 KiB) TX bytes:210544 (205.6 KiB)

virbr0 Link encap:Ethernet HWaddr 52:54:00:26:39:37
inet addr:192.168.122.1 Bcast:192.168.122.255 Mask:255.255.255.0
UP BROADCAST RUNNING MULTICAST MTU:1500 Metric:1
RX packets:0 errors:0 dropped:0 overruns:0 frame:0
TX packets:0 errors:0 dropped:0 overruns:0 carrier:0
collisions:0 txqueuelen:0
RX bytes:0 (0.0 b) TX bytes:0 (0.0 b)

[czh@centos6 bin]$ service iptables stop
iptables: Only usable by root. [WARNING]
[czh@centos6 bin]$ sudo service iptables stop
[sudo] password for czh:
iptables: Setting chains to policy ACCEPT: filter [ OK ]
iptables: Flushing firewall rules: [ OK ]
iptables: Unloading modules: [ OK ]
[czh@centos6 bin]$

2018年2月20日 下午9:18

下载git2.8

1
2
3
4
5
6
7
[czh@centos6 developer]$ sudo wget http://learning.happymmall.com/git/git-v2.8.0.tar.gz
--2018-02-20 21:34:58-- http://learning.happymmall.com/git/git-v2.8.0.tar.gz
正在解析主机 learning.happymmall.com... 182.92.82.103
正在连接 learning.happymmall.com|182.92.82.103|:80... 已连接。
已发出 HTTP 请求,正在等待回应... 200 OK
长度:5825295 (5.6M) [text/html]
正在保存至: “git-v2.8.0.tar.gz”

安装依赖:

1
sudo yum -y install zlib-devel openssl-devel cpio expat-devel gettext-devel curl-devel  perl-ExtUtils-CBuilder perl-ExtUtils-MakeMaker

编译git

1
2
[czh@centos6 developer]$ cd git-2.8.0/
[czh@centos6 git-2.8.0]$ sudo make prefix=/user/local all

安装git

1
sudo make prefix=/usr/local install

查看git版本

1
2
[czh@centos6 git-2.8.0]$ git --version
git version 2.8.0

新建一个文件夹gitdownload

1
2
[czh@centos6 git-2.8.0]$  cd ~/developer/
[czh@centos6 developer]$ mkdir gitdownload

生成秘钥:
如何建立linux ssh信任的方法与常见问题_百度知道

1
2
3
4
5
6
7
8
9
10
11
12
13
14
15
16
17
18
19
20
21
22
23
24
25
26
27
28
29
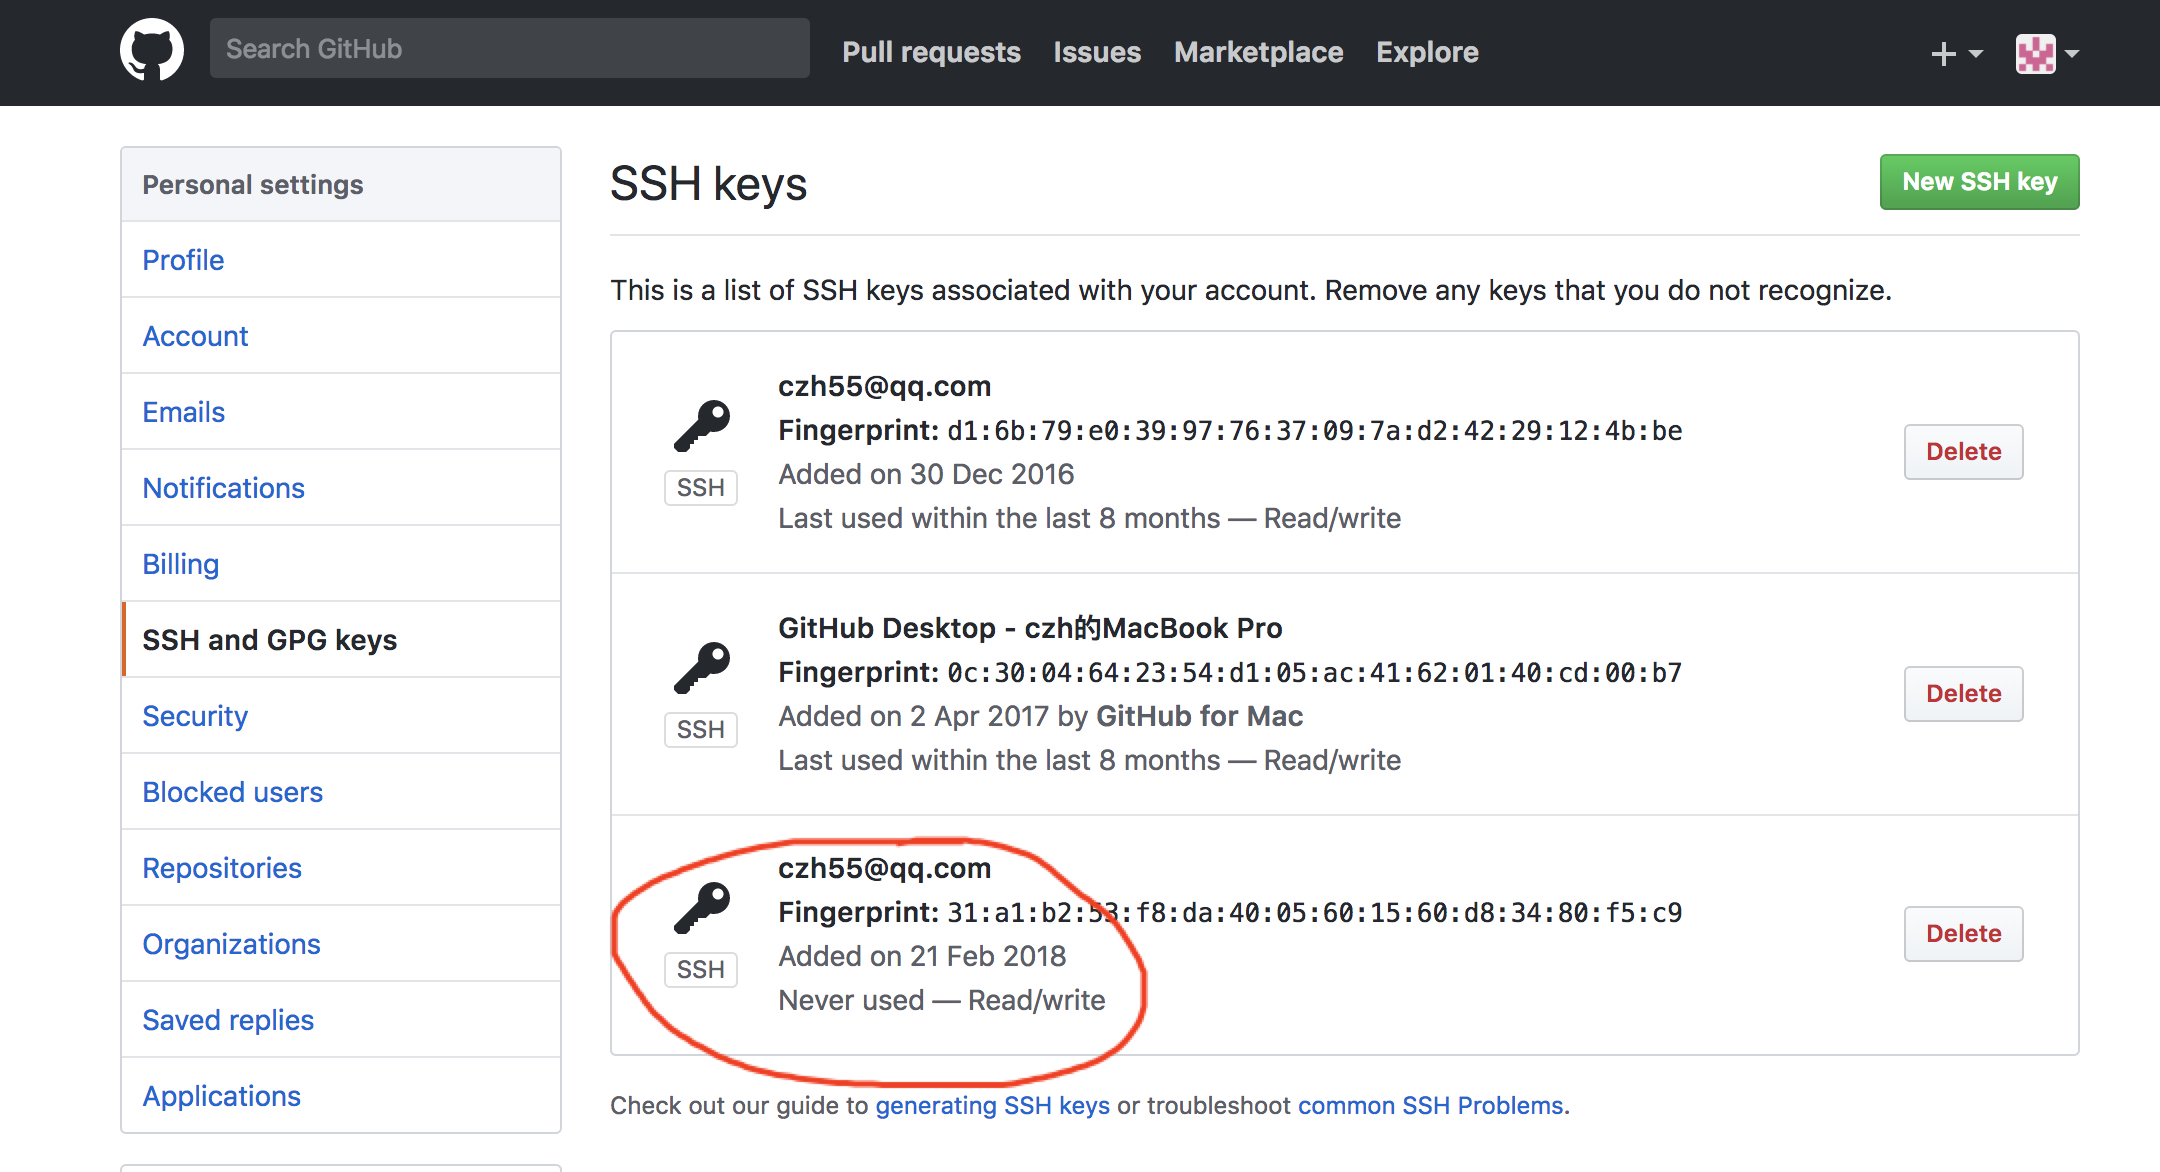
[czh@centos6 .ssh]$ ssh-keygen -t rsa -C "czh55@qq.com"
Generating public/private rsa key pair.
Enter file in which to save the key (/home/czh/.ssh/id_rsa):
Enter passphrase (empty for no passphrase):
Enter same passphrase again:
Your identification has been saved in /home/czh/.ssh/id_rsa.
Your public key has been saved in /home/czh/.ssh/id_rsa.pub.
The key fingerprint is:
31:a1:b2:53:f8:da:40:05:60:15:60:d8:34:80:f5:c9 czh55@qq.com
The key's randomart image is:
+--[ RSA 2048]----+
|o*O++o. . |
|oo.+ + . . |
| E o o |
| . = o |
| + . S |
| = |
| . . |
| |
| |
+-----------------+
[czh@centos6 .ssh]$ ssh-add ~/.ssh/id_rsa
Identity added: /home/czh/.ssh/id_rsa (/home/czh/.ssh/id_rsa)
[czh@centos6 .ssh]$ ll
总用量 8
-rw-------. 1 czh czh 1675 2月 21 00:11 id_rsa
-rw-r--r--. 1 czh czh 394 2月 21 00:11 id_rsa.pub
[czh@centos6 .ssh]$ cat ~/.ssh/id_rsa.pub
ssh-rsa AAAAB3NzaC1yc2EAAAABIwAAAQEAx3IlwhJZNJXM4BeYPmdrdURMAZxd/2k6ePmcJnddS20R4Y13N4dsqkGiK2qaQIJmHv07O5/hiaUztq/HHFj9bhNCxvNVjFZq6k6IWfNYj6eUuSc/5wtdsoGRkVKjxxW/Cxw21SmwM7d8ax7/4QTJTLM2/EcOBtA+v6QZ1++2Khj0slhhxIixxyccxV0NG0SvLo3oKG4alfUU43Pt7+a1BL7jUXdnUzr5GTpF6Z2XgBjn3NkSjQZb5EYcI14UzwldR7H6JBIqQySG1VAEIitasJFLEMRKVyhnyOdR+p6jkX7WNYerP/BB9OtqUg7OSFlkk7OXM1D49i+83pr00YDiFQ== czh55@qq.com

编码配置:

1
2
[czh@centos6 gitdownload]$ git config --global gui.encoding utf-8
[czh@centos6 gitdownload]$ git config --global core.quotepath off

克隆:

1
2
3
4
5
6
7
8
9
10
11
12
13
14
15
16
[czh@centos6 developer]$ cd gitdownload/
[czh@centos6 gitdownload]$ git clone git@github.com:czh55/imooc.git
正克隆到 'imooc'...
The authenticity of host 'github.com (192.30.255.112)' can't be established.
RSA key fingerprint is 16:27:ac:a5:76:28:2d:36:63:1b:56:4d:eb:df:a6:48.
Are you sure you want to continue connecting (yes/no)? yea
Please type 'yes' or 'no': yes
Warning: Permanently added 'github.com,192.30.255.112' (RSA) to the list of known hosts.
remote: Counting objects: 3, done.
remote: Total 3 (delta 0), reused 0 (delta 0), pack-reused 0
接收对象中: 100% (3/3), 完成.
检查连接... 完成。
[czh@centos6 gitdownload]$ ll
总用量 4
drwxrwxr-x. 3 czh czh 4096 2月 21 00:17 imooc
[czh@centos6 gitdownload]$

2018年2月20日 下午6:35

安装mysql

1
[czh@centos6 vhost]$ sudo yum -y install mysql-server

配置字符集

1
[czh@centos6 vhost]$ sudo vim /etc/my.cnf

1
2
3
4
5
6
7
8
9
10
[mysqld]
datadir=/var/lib/mysql
socket=/var/lib/mysql/mysql.sock
user=mysql
# Disabling symbolic-links is recommended to prevent assorted security risks
symbolic-links=0
default-character-set=utf8
[mysqld_safe]
log-error=/var/log/mysqld.log
pid-file=/var/run/mysqld/mysqld.pid

设置开机自启:

1
[czh@centos6 vhost]$ sudo chkconfig mysqld on
1
2
3
4
5
6
[czh@centos6 vhost]$ sudo chkconfig --list mysqld
mysqld 0:关闭 1:关闭 2:启用 3:启用 4:启用 5:启用 6:关闭
```


第一次启动mysql

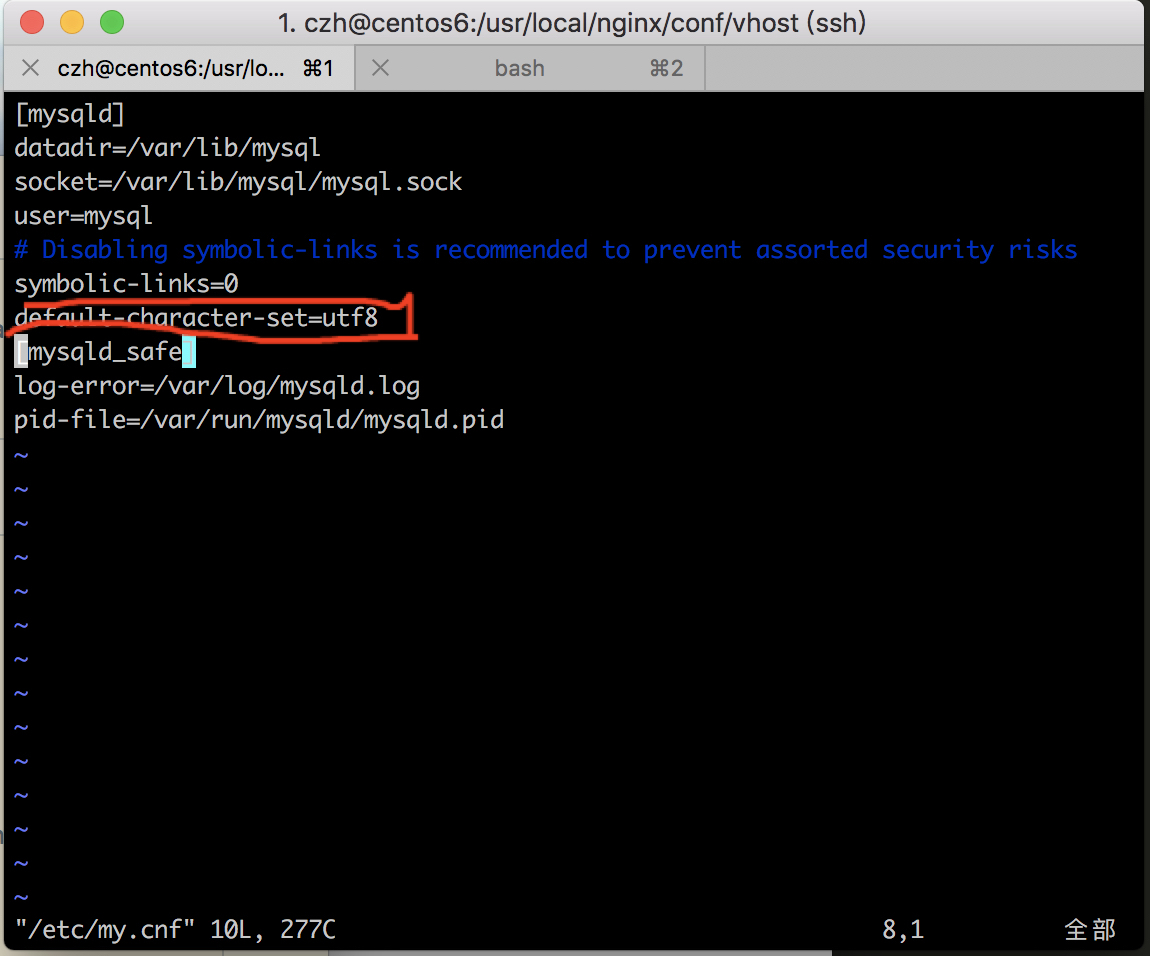
[czh@centos6 vhost]$ sudo service mysqld start
Initializing MySQL database: WARNING: The host ‘centos6.8-linux.shared’ could not be looked up with resolveip.
This probably means that your libc libraries are not 100 % compatible
with this binary MySQL version. The MySQL daemon, mysqld, should work
normally with the exception that host name resolving will not work.
This means that you should use IP addresses instead of hostnames
when specifying MySQL privileges !
Installing MySQL system tables…
180220 18:41:23 [Warning] ‘–default-character-set’ is deprecated and will be removed in a future release. Please use ‘–character-set-server’ instead.
OK
Filling help tables…
180220 18:41:23 [Warning] ‘–default-character-set’ is deprecated and will be removed in a future release. Please use ‘–character-set-server’ instead.
OK

To start mysqld at boot time you have to copy
support-files/mysql.server to the right place for your system

PLEASE REMEMBER TO SET A PASSWORD FOR THE MySQL root USER !
To do so, start the server, then issue the following commands:

/usr/bin/mysqladmin -u root password ‘new-password’
/usr/bin/mysqladmin -u root -h centos6.8-linux.shared password ‘new-password’

Alternatively you can run:
/usr/bin/mysql_secure_installation

which will also give you the option of removing the test
databases and anonymous user created by default. This is
strongly recommended for production servers.

See the manual for more instructions.

You can start the MySQL daemon with:
cd /usr ; /usr/bin/mysqld_safe &

You can test the MySQL daemon with mysql-test-run.pl
cd /usr/mysql-test ; perl mysql-test-run.pl

Please report any problems with the /usr/bin/mysqlbug script!

[  OK  ]

Starting mysqld: [ OK ]

1
2

第一次登陆,并删除匿名用户:

[czh@centos6 vhost]$ mysql -u root
Welcome to the MySQL monitor. Commands end with ; or \g.
Your MySQL connection id is 2
Server version: 5.1.73 Source distribution

Copyright (c) 2000, 2013, Oracle and/or its affiliates. All rights reserved.

Oracle is a registered trademark of Oracle Corporation and/or its
affiliates. Other names may be trademarks of their respective
owners.

Type ‘help;’ or ‘\h’ for help. Type ‘\c’ to clear the current input statement.

mysql> select user,host from mysql.user
-> ;
+——+————————+
| user | host |
+——+————————+
| root | 127.0.0.1 |
| | centos6.8-linux.shared |
| root | centos6.8-linux.shared |
| | localhost |
| root | localhost |
+——+————————+
5 rows in set (0.00 sec)

mysql> delete from mysql.user where user=’’;
Query OK, 2 rows affected (0.00 sec)

mysql> select user,host from mysql.user;
+——+————————+
| user | host |
+——+————————+
| root | 127.0.0.1 |
| root | centos6.8-linux.shared |
| root | localhost |
+——+————————+
3 rows in set (0.00 sec)

1
2
3


配置防火墙:

[czh@centos6 vhost]$ sudo vim /etc/sysconfig/iptables

1
2
3
4
![](/74E02787-D9CB-4CD1-92A6-774BE5F0FB89.png)


mysql新增用户:

mysql> insert into mysql.user(Host,User,Password)values(“localhost”,”mmall”,password(“mmall”));
Query OK, 1 row affected, 3 warnings (0.00 sec)

mysql> select user,host from mysql.user;
+——+————————+
| user | host |
+——+————————+
| root | 127.0.0.1 |
| root | centos6.8-linux.shared |
| mmal | localhost |
| root | localhost |
+——+————————+
4 rows in set (0.00 sec)

mysql>

1
2
3
4


创建数据库:
注:这里的数据库名用``,而不是使用单引号’‘

mysql> create database mmall default character set utf8 collate utf8_general_ci;
Query OK, 1 row affected (0.00 sec)

1
2
3

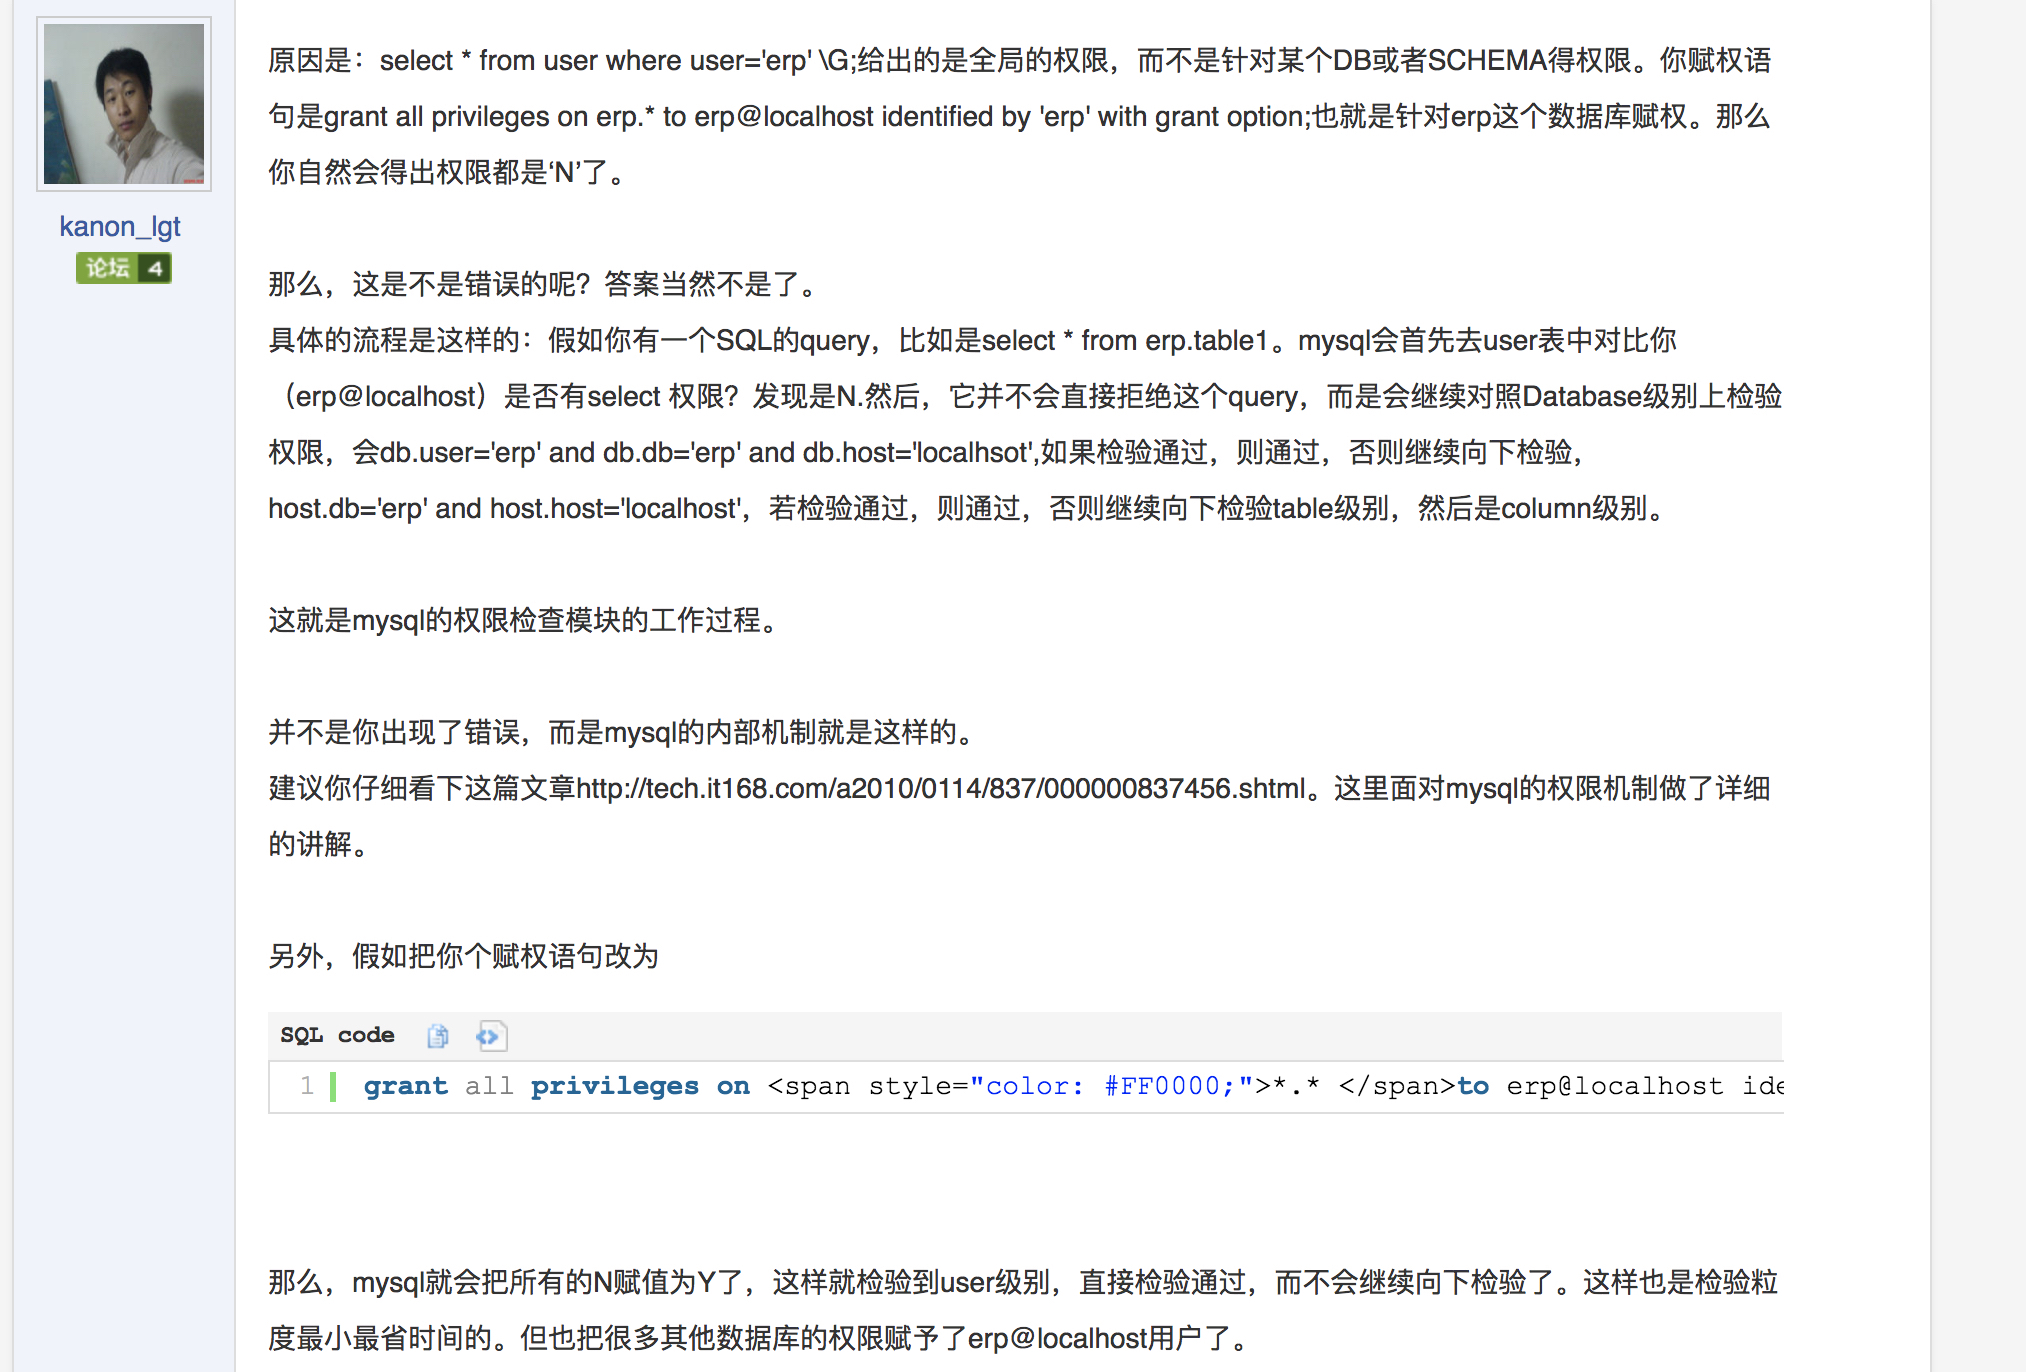
查看和设置权限:
[mysql权限](bear://x-callback-url/open-note?id=4FE6BA17-41ED-45D6-9335-A994D160CBFF-331-0004AB35243310F3)这里要看这片文章才会明白为啥设计了权限之后,我们的select * from mysql.user \G;之后结果仍然为N

mysql> select * from mysql.user \G;
*** 1. row ***
Host: localhost
User: root
Password:
Select_priv: Y
Insert_priv: Y
Update_priv: Y
Delete_priv: Y
Create_priv: Y
Drop_priv: Y
Reload_priv: Y
Shutdown_priv: Y
Process_priv: Y
File_priv: Y
Grant_priv: Y
References_priv: Y
Index_priv: Y
Alter_priv: Y
Show_db_priv: Y
Super_priv: Y
Create_tmp_table_priv: Y
Lock_tables_priv: Y
Execute_priv: Y
Repl_slave_priv: Y
Repl_client_priv: Y
Create_view_priv: Y
Show_view_priv: Y
Create_routine_priv: Y
Alter_routine_priv: Y
Create_user_priv: Y
Event_priv: Y
Trigger_priv: Y
ssl_type:
ssl_cipher:
x509_issuer:
x509_subject:
max_questions: 0
max_updates: 0
max_connections: 0
max_user_connections: 0
*** 2. row ***
Host: centos6.8-linux.shared
User: root
Password:
Select_priv: Y
Insert_priv: Y
Update_priv: Y
Delete_priv: Y
Create_priv: Y
Drop_priv: Y
Reload_priv: Y
Shutdown_priv: Y
Process_priv: Y
File_priv: Y
Grant_priv: Y
References_priv: Y
Index_priv: Y
Alter_priv: Y
Show_db_priv: Y
Super_priv: Y
Create_tmp_table_priv: Y
Lock_tables_priv: Y
Execute_priv: Y
Repl_slave_priv: Y
Repl_client_priv: Y
Create_view_priv: Y
Show_view_priv: Y
Create_routine_priv: Y
Alter_routine_priv: Y
Create_user_priv: Y
Event_priv: Y
Trigger_priv: Y
ssl_type:
ssl_cipher:
x509_issuer:
x509_subject:
max_questions: 0
max_updates: 0
max_connections: 0
max_user_connections: 0
*** 3. row ***
Host: 127.0.0.1
User: root
Password:
Select_priv: Y
Insert_priv: Y
Update_priv: Y
Delete_priv: Y
Create_priv: Y
Drop_priv: Y
Reload_priv: Y
Shutdown_priv: Y
Process_priv: Y
File_priv: Y
Grant_priv: Y
References_priv: Y
Index_priv: Y
Alter_priv: Y
Show_db_priv: Y
Super_priv: Y
Create_tmp_table_priv: Y
Lock_tables_priv: Y
Execute_priv: Y
Repl_slave_priv: Y
Repl_client_priv: Y
Create_view_priv: Y
Show_view_priv: Y
Create_routine_priv: Y
Alter_routine_priv: Y
Create_user_priv: Y
Event_priv: Y
Trigger_priv: Y
ssl_type:
ssl_cipher:
x509_issuer:
x509_subject:
max_questions: 0
max_updates: 0
max_connections: 0
max_user_connections: 0
*** 4. row ***
Host: localhost
User: mmal
Password: *B24D58108523CB417C6988470B0FD4141D7FBAF6
Select_priv: N
Insert_priv: N
Update_priv: N
Delete_priv: N
Create_priv: N
Drop_priv: N
Reload_priv: N
Shutdown_priv: N
Process_priv: N
File_priv: N
Grant_priv: N
References_priv: N
Index_priv: N
Alter_priv: N
Show_db_priv: N
Super_priv: N
Create_tmp_table_priv: N
Lock_tables_priv: N
Execute_priv: N
Repl_slave_priv: N
Repl_client_priv: N
Create_view_priv: N
Show_view_priv: N
Create_routine_priv: N
Alter_routine_priv: N
Create_user_priv: N
Event_priv: N
Trigger_priv: N
ssl_type:
ssl_cipher:
x509_issuer:
x509_subject:
max_questions: 0
max_updates: 0
max_connections: 0
max_user_connections: 0
4 rows in set (0.00 sec)

ERROR:
No query specified

1
2


mysql> grant all privileges on mmall.* to mmall@’%’ identified by ‘mmall’ with grant option;
Query OK, 0 rows affected (0.00 sec)

1
2
3
注:此时的结果不变

设置root用户密码:

mysql> set password for root@localhost=password(‘root’);
Query OK, 0 rows affected (0.00 sec)

mysql> set password for 127.0.0.1@localhost=password(‘root’);
ERROR 1064 (42000): You have an error in your SQL syntax; check the manual that corresponds to your MySQL server version for the right syntax to use near ‘127.0.0.1@localhost=password(‘root’)’ at line 1
mysql> set password for root@127.0.0.1=password(‘root’);
Query OK, 0 rows affected (0.00 sec)

mysql> select user,host,password from mysql.user;
+——-+————————+——————————————-+
| user | host | password |
+——-+————————+——————————————-+
| root | localhost | *81F5E21E35407D884A6CD4A731AEBFB6AF209E1B |
| root | centos6.8-linux.shared | |
| root | 127.0.0.1 | *81F5E21E35407D884A6CD4A731AEBFB6AF209E1B |
| mmall | % | *B24D58108523CB417C6988470B0FD4141D7FBAF6 |
| mmall | localhost | *B24D58108523CB417C6988470B0FD4141D7FBAF6 |
+——-+————————+——————————————-+
5 rows in set (0.00 sec)

mysql>

1
2

密码登陆msyql:

[czh@centos6 vhost]$ mysql -u root -p
Enter password:
Welcome to the MySQL monitor. Commands end with ; or \g.
Your MySQL connection id is 8

1
2

重启mysql

[czh@centos6 vhost]$ sudo service mysqld restart
[sudo] password for czh:
Stopping mysqld: [ OK ]
Starting mysqld: [ OK ]

1
2
3
4


navicat连接mysql:
[MYSQL ERROR 2003 (HY000): Can’t connect to MySQL server on ‘192.168.10.210’ (111) 解决方法 - 当年亦如是 - 博客园](https://www.cnblogs.com/zihanxing/p/7049244.html)

[czh@localhost bin]$ mysql -u root -p
Enter password:
Welcome to the MySQL monitor. Commands end with ; or \g.
Your MySQL connection id is 4
Server version: 5.1.73 Source distribution

Copyright (c) 2000, 2013, Oracle and/or its affiliates. All rights reserved.

Oracle is a registered trademark of Oracle Corporation and/or its
affiliates. Other names may be trademarks of their respective
owners.

Type ‘help;’ or ‘\h’ for help. Type ‘\c’ to clear the current input statement.

mysql> select user,host from mysql.user;
+——-+————————+
| user | host |
+——-+————————+
| mmall | % |
| root | 127.0.0.1 |
| root | centos6.8-linux.shared |
| mmall | localhost |
| root | localhost |
+——-+————————+
5 rows in set (0.00 sec)

mysql> GRANT ALL PRIVILEGES ON . TO ‘root’@’%’ IDENTIFIED BY ‘root’ WITH GRANT OPTION;
Query OK, 0 rows affected (0.00 sec)

mysql> flush privileges;
Query OK, 0 rows affected (0.00 sec)

注:当我将上面的提高的全部更改之后,发现我的navicat坏了,总提示超时,我重新下载了一个就好了。